A couple of weekends ago Alex and I headed up to the blue mountain for our friends' wedding - we had a grand time and it was a really lovely celebration. I decided to make myself a clutch for the occasion since I didn't own a small purse that matched my dress.
I used Anna's Envelope Clutch pattern and made the small version with a pointed flap. I didn't have a swivel clasp on hand (and no time to head to the fabric store) so I inserted the wrist strap directly to the pouch while sewing it together. I used Essex linen/cotton in natural for the body and some Liberty of London tana lawn in Caesar for the flap. The Liberty was a gift from the super-awesome Jo and is actually available in her Etsy shop right now!
For the interior I used the turtle bay print in aqua from Tula Pink's Prince Charming collection; I also used the same print in cream for creating the little accordion pocket (which I think I messed up by the way, but it still works). I included one of my labels that I printed through Spoonflower... ya know, just in case I forget who made it *wink*!
As always, Anna's pattern was well-laid out with lots of pictures and great instructions! I really enjoyed making this clutch and will definitely be making more in the future. I want to make a bigger version with the other flap style for carrying around day-to-day when I don't need my huge purse; I also want to try a version with piping since I've never tried it before!
I also made Tim and Julie a card to go along with their wedding presents. I absolutely love using small fabric scraps for making cards and have made quite a few in the past - it's especially great for using up little bits of fabric that are too small for actual patchwork. As you can see there are some small pieces of original release Flea Market Fancy in there that I've been keeping; I keep all of my teeny pieces in a sandwich sized zipper bag so that they're easy to access when I'm card making.
If you stay posted to my little space here you just might see some more cards coming in the near future... just sayin' *double wink*!!
Thursday, August 23, 2012
Thursday, August 16, 2012
Quilts at the Creek
A couple of weeks ago I participated in Quilts at the Creek where I showed two of my quilts. Quilts at the Creek was put on by the York Heritage Quilter's Guild in cooperation with Black Creek Pioneer Village; the YHQG asked my guild (the Toronto Modern Quilt Guild) to participate in the show with them and so I decided to put in two quilts that were finished somewhat recently.
Black Creek Pioneer Village is very cool and most of the quilts were hung up outside in various places throughout the village. I've heard a rumour that the show did so well that Black Creek has already decided they want to do the show again next year. Both my mum and Sheila drove into Toronto and the three of us spent the day at the show together; we walked around and visited all of the quilts, went into most of the buildings, watched a weaving demonstration (I recently found out that we somehow missed a hand quilting demonstration), and went to the fabric marketplace about five times as well as the actual giftshop.
Before we get into a few pictures, can I just say that I'm a complete moron and didn't actually take pictures of any of the quilts. The only reason I have any pictures of my own quilts in the show is because Sheila and my mum both took pictures of them. Yep, I totally rock.
This photo was taken by Sheila (using my phone) and that's me standing in between my two quilts. The one on the right is The Geese Have Landed which has been shown on this blog before, however the one of the left is Mineshaft which I haven't shared. Mineshaft has actually been done for a little while now, but is one that I'm currently writing a pattern for (hopefully it will be done and for sale very soon). I originally intended to put another quilt into the show but it didn't fit the width dimensions that they wanted as it's destined to be a wall hanging. And yes, both of those quilts contain a whole heck of a lot of Tula Pink - you know I love her!
A little anecdote: When I originally ventured out to find my quilts at the show I was dismayed to find that Mineshaft had been hung sideways - as in with the long side across the clothesline (despite the fact that the quilt back is pieced and that it has TWO labels on it that). Luckily a staff member wondered by as I was saying all of this to my mum and got it fixed! I wish they hadn't folded the top over like that (especially since it's crooked which you can really see in the next picture).
These are the backs of my quilts! You'll see better pictures of the Mineshaft back when I release the pattern but I must say that I love it! This is where I was standing taking pictures (not this picture obviously) when I heard two older women dissing my Mineshaft quilt - not cool!! Needless to say I didn't go near my quilts again for the rest of the day.
Here are a couple of goodies that I picked up both at the Marketplace and in the gift shop. The six fat quarters on the side (as well as a Moda scrap bag that isn't in the picture) are from Log Cabin Yardage which is a Canadian online shop. The hand dyed fabric pieces are from Good Lines Decor - they were made using pre-loved cotton and dyed with vegetable dyes - I think the colours are seriously awesome! The yarn is from the gift shop at Black Creek - it was hand spun at the village using wool from their Border-Leicester's (who I saw - cute sheep!) and hand dyed using indigo and osage. The little tag on it even has the name of the girl who made - her name is Kelly. I also bought a set of handmade leather buttons in the gift shop but they're not in the picture either.
I definitely think that I'll do Quilts at the Creek again and next year, I promise, I'll actually take pictures of the quilts!
Black Creek Pioneer Village is very cool and most of the quilts were hung up outside in various places throughout the village. I've heard a rumour that the show did so well that Black Creek has already decided they want to do the show again next year. Both my mum and Sheila drove into Toronto and the three of us spent the day at the show together; we walked around and visited all of the quilts, went into most of the buildings, watched a weaving demonstration (I recently found out that we somehow missed a hand quilting demonstration), and went to the fabric marketplace about five times as well as the actual giftshop.
Before we get into a few pictures, can I just say that I'm a complete moron and didn't actually take pictures of any of the quilts. The only reason I have any pictures of my own quilts in the show is because Sheila and my mum both took pictures of them. Yep, I totally rock.
This photo was taken by Sheila (using my phone) and that's me standing in between my two quilts. The one on the right is The Geese Have Landed which has been shown on this blog before, however the one of the left is Mineshaft which I haven't shared. Mineshaft has actually been done for a little while now, but is one that I'm currently writing a pattern for (hopefully it will be done and for sale very soon). I originally intended to put another quilt into the show but it didn't fit the width dimensions that they wanted as it's destined to be a wall hanging. And yes, both of those quilts contain a whole heck of a lot of Tula Pink - you know I love her!
A little anecdote: When I originally ventured out to find my quilts at the show I was dismayed to find that Mineshaft had been hung sideways - as in with the long side across the clothesline (despite the fact that the quilt back is pieced and that it has TWO labels on it that). Luckily a staff member wondered by as I was saying all of this to my mum and got it fixed! I wish they hadn't folded the top over like that (especially since it's crooked which you can really see in the next picture).
These are the backs of my quilts! You'll see better pictures of the Mineshaft back when I release the pattern but I must say that I love it! This is where I was standing taking pictures (not this picture obviously) when I heard two older women dissing my Mineshaft quilt - not cool!! Needless to say I didn't go near my quilts again for the rest of the day.
Here are a couple of goodies that I picked up both at the Marketplace and in the gift shop. The six fat quarters on the side (as well as a Moda scrap bag that isn't in the picture) are from Log Cabin Yardage which is a Canadian online shop. The hand dyed fabric pieces are from Good Lines Decor - they were made using pre-loved cotton and dyed with vegetable dyes - I think the colours are seriously awesome! The yarn is from the gift shop at Black Creek - it was hand spun at the village using wool from their Border-Leicester's (who I saw - cute sheep!) and hand dyed using indigo and osage. The little tag on it even has the name of the girl who made - her name is Kelly. I also bought a set of handmade leather buttons in the gift shop but they're not in the picture either.
I definitely think that I'll do Quilts at the Creek again and next year, I promise, I'll actually take pictures of the quilts!
Monday, August 13, 2012
A Little Catch Up
So, it's been a while since I last posted! It's been a rough couple of months - what with not having a job and such, but I'm trying to keep myself busy and not dwell too much on all of the negatives. Let's do a little catch up post here! I've been crafting quite a bit and have a few things to share, so let's do a few now and then some more later in the week!
I finished the first of my Seaweed Socks - woot! The pattern is available for free on Wendy Johnson's site and the yarn is Madelinetosh Sock in Iceburg (which is a discontinued colourway). I'm just about to start working the gusset for the second sock and hopefully I'll have both socks fully done within the next week or so. When they're both done I'll take some better pictures so that you can really see the colour.
I stitched up this little Bob and Doug McKenzie duo as a gift for my mum. The pattern is from Wee Little Stitches on Etsy and was super fun to stitch! Seriously hard to photograph so in case you can't read it the line on the bottom says "take off, you hoser" (you may need to be Canadian to get this one).
I also knitted up three teeny-tiny preemie hats for charity; I'm going to make more since I can probably get five or so hats out of each skein and they really are super-fast. I feel good knowing that such a little thing I've made can bring some serious warmth and comfort to others. The pattern is available for free and there are five different variations on the hat; I'm planning on making one of each version in both pink and blue.
And, a little announcement, Pretty in Patchwork: Holidays is now available for purchase in the print edition!! It came out on August 7th and should be available in all major bookstores as well as online at places like Amazon and Indigo. Also, just in case print isn't your thing or you want to get the book instantly, it is still available as an ebook as well.
In case you don't remember (or weren't around these parts when I first announced it), this is my pattern from the book - the Countdown-to-Christmas Advent Calendar! My pattern mixes English paper piecing, stamping, and a little patchwork to create a fun and easy calendar with pockets just big enough for a small chocolate or toy.
I have a few other things and announcements to share but we'll wait and do that a little bit later! I hope y'all enjoyed catching up with me here. I'll talk to you soon!
I finished the first of my Seaweed Socks - woot! The pattern is available for free on Wendy Johnson's site and the yarn is Madelinetosh Sock in Iceburg (which is a discontinued colourway). I'm just about to start working the gusset for the second sock and hopefully I'll have both socks fully done within the next week or so. When they're both done I'll take some better pictures so that you can really see the colour.
I stitched up this little Bob and Doug McKenzie duo as a gift for my mum. The pattern is from Wee Little Stitches on Etsy and was super fun to stitch! Seriously hard to photograph so in case you can't read it the line on the bottom says "take off, you hoser" (you may need to be Canadian to get this one).
I also knitted up three teeny-tiny preemie hats for charity; I'm going to make more since I can probably get five or so hats out of each skein and they really are super-fast. I feel good knowing that such a little thing I've made can bring some serious warmth and comfort to others. The pattern is available for free and there are five different variations on the hat; I'm planning on making one of each version in both pink and blue.
And, a little announcement, Pretty in Patchwork: Holidays is now available for purchase in the print edition!! It came out on August 7th and should be available in all major bookstores as well as online at places like Amazon and Indigo. Also, just in case print isn't your thing or you want to get the book instantly, it is still available as an ebook as well.
In case you don't remember (or weren't around these parts when I first announced it), this is my pattern from the book - the Countdown-to-Christmas Advent Calendar! My pattern mixes English paper piecing, stamping, and a little patchwork to create a fun and easy calendar with pockets just big enough for a small chocolate or toy.
I have a few other things and announcements to share but we'll wait and do that a little bit later! I hope y'all enjoyed catching up with me here. I'll talk to you soon!
Tuesday, July 17, 2012
Tutorial: Quilt-As-You-Go Hexie Coasters!
Y'all ready for this? I've got a new tutorial for you... may I present the Quilt-As-You-Go Hexie Coasters!
Woot! I actually made this coaster and took all of the pictures for this post about two months ago... I think I may have procrastinated in the posting a little bit *blush*. But I think it turned out pretty darned cute, don't you? Okay, now who wants to get started?! Let's go!!
Materials:
For Hexies:
9 fabric squares measuring 2.5x2.5" each
9 one-inch hexagon templates*
Hand sewing needle
Hand sewing thread
For Coasters:
5x5" piece of muslin or scrap fabric for foundation**
5x5" piece of thin batting
5x5" piece of fabric for backing
Scrap of fabric 1.25x22" for binding
* You can make your own hexagon graph paper here (just be sure to select the 1 inch option and measure one side to be sure after you've printed them out) or order some pre-made templates from here. I've done both.
**This piece of fabric is merely used as a foundation for the hexagons and will not be seen, so go ahead and use something truly ugly!!
Now, I'm going to start off by showing you the method that I use to make hexies. This method works especially well for this type of project, but if you make your hexies a different way - go for it! You may need to be a little more careful when you get to the quilt-as-you-go portion of this tutorial, but I think it'll still work out. If you already know how to make hexies, just skip this portion of the tutorial, but make sure that you have 9 completed hexies before moving on to the next portion.
English Paper-Piecing Directions:
Pin one hexagon template to one 2.5x2.5" fabric square and trim the fabric down, leaving 1/4" around all sides of the hexagon template. Have a length of thread in your needle, knotted, and ready to go!
Fold one edge of the fabric down so that it is snug against the edge of the template.
Fold the adjoining edge down so that it too is snug against the template and so that the fabric overlaps at the corner.
Run your needle and thread through the corner of the fabric, being careful not to pick up any of the paper template in the process. Pull the thread all the way through so that the knot if snug to the fabric.
Run your needle and thread through the corner once more to secure it in place. Pull all of the way though.
Fold down the next corner just as did before and bring your needle across. Repeat the above steps to secure the corner. Pull the thread taut, but not so tightly that the template curls - this will ensure that the edges of the fabric all stay in place.
Repeat the above steps all of the way around the hexagon. At the last corner run your needle through a couple of times as above and secure with a knot. Cut your thread.
And there you have a completed hexie! Repeat the steps above until you have 9 completed hexagons for your coaster.
Quilt-As-You-Go Coaster Directions:
Draw a light line in pencil 1/4" away from the edge all around your muslin foundation piece. Layer your muslin, batting, and backing as shown ensuring that the backing is right side down and that the pencil markings on the muslin are facing up.
Pop the templates out of all of your hexagons. If you used the method that I described above to make your hexagons than they will hold their shape when the templates are removed. If you used another method they may not hold their shape so well and should be handled with care.
Begin by placing one hexagon in the top, right corner so that it's corners and top edge are flush with the 1/4" lines you drew on the muslin. Pin in place and, if you wish, use pins to baste around it to keep the three quilt layers from shifting.
Sew 1/16 to 1/8" from the edge all of the way around your first hexagon. Obviously, for this one (and a few others) the hexagon goes over the edge of the foundation so just stop sewing when you reach the edge. Make sure to smooth out your hexagon and to keep the edges of the hexie flat as you sew.
Align your next hexie so that it's top edge is butting against the bottom edge of the one you've just sewn. Sew all the way around.
Repeat the steps above until you have your entire muslin covered. For the smaller areas of blank space left on the left hand side of the coaster, trim some excess off of a hexagon you've already attached - once all of the hexies are sewn on you will see this excess, just use the edge of the muslin as a guide (so sorry that I forgot to take pictures of this step) - sew this excess onto the small blank spaces. Most of these small spaces will be covered by the binding, but it's always best to fill in as much as possible.
Evenly trim your coaster down to 4.5" square - this would mean trimming your coaster down about 1/4" on all four sides, but be careful since the coaster may have shrunk slightly with the quilting.
Use the binding strip that you have set aside and bind as desired. I did it the "traditional" way by machine sewing the front side, then folding over and hand sewing the back, but you could machine sew the whole thing on if you wanted! And see all of the pretty quilting that shows on the back from sewing around the hexagons - ohhh yaaaa!
Grab yourself a drink and enjoy! Anne of Green Gables mug totally optional of course but I would highly recommend it *wink*!
So what do y'all think? I really hope you liked this tutorial and if you have any questions, please feel free to ask. Be sure to send me pictures or add them to the Flickr group if you do make a hexie coaster or two using this tutorial!
Woot! I actually made this coaster and took all of the pictures for this post about two months ago... I think I may have procrastinated in the posting a little bit *blush*. But I think it turned out pretty darned cute, don't you? Okay, now who wants to get started?! Let's go!!
Materials:
For Hexies:
9 fabric squares measuring 2.5x2.5" each
9 one-inch hexagon templates*
Hand sewing needle
Hand sewing thread
For Coasters:
5x5" piece of muslin or scrap fabric for foundation**
5x5" piece of thin batting
5x5" piece of fabric for backing
Scrap of fabric 1.25x22" for binding
* You can make your own hexagon graph paper here (just be sure to select the 1 inch option and measure one side to be sure after you've printed them out) or order some pre-made templates from here. I've done both.
**This piece of fabric is merely used as a foundation for the hexagons and will not be seen, so go ahead and use something truly ugly!!
Now, I'm going to start off by showing you the method that I use to make hexies. This method works especially well for this type of project, but if you make your hexies a different way - go for it! You may need to be a little more careful when you get to the quilt-as-you-go portion of this tutorial, but I think it'll still work out. If you already know how to make hexies, just skip this portion of the tutorial, but make sure that you have 9 completed hexies before moving on to the next portion.
English Paper-Piecing Directions:
Pin one hexagon template to one 2.5x2.5" fabric square and trim the fabric down, leaving 1/4" around all sides of the hexagon template. Have a length of thread in your needle, knotted, and ready to go!
Fold one edge of the fabric down so that it is snug against the edge of the template.
Fold the adjoining edge down so that it too is snug against the template and so that the fabric overlaps at the corner.
Run your needle and thread through the corner of the fabric, being careful not to pick up any of the paper template in the process. Pull the thread all the way through so that the knot if snug to the fabric.
Run your needle and thread through the corner once more to secure it in place. Pull all of the way though.
Fold down the next corner just as did before and bring your needle across. Repeat the above steps to secure the corner. Pull the thread taut, but not so tightly that the template curls - this will ensure that the edges of the fabric all stay in place.
Repeat the above steps all of the way around the hexagon. At the last corner run your needle through a couple of times as above and secure with a knot. Cut your thread.
And there you have a completed hexie! Repeat the steps above until you have 9 completed hexagons for your coaster.
Quilt-As-You-Go Coaster Directions:
Draw a light line in pencil 1/4" away from the edge all around your muslin foundation piece. Layer your muslin, batting, and backing as shown ensuring that the backing is right side down and that the pencil markings on the muslin are facing up.
Pop the templates out of all of your hexagons. If you used the method that I described above to make your hexagons than they will hold their shape when the templates are removed. If you used another method they may not hold their shape so well and should be handled with care.
Begin by placing one hexagon in the top, right corner so that it's corners and top edge are flush with the 1/4" lines you drew on the muslin. Pin in place and, if you wish, use pins to baste around it to keep the three quilt layers from shifting.
Sew 1/16 to 1/8" from the edge all of the way around your first hexagon. Obviously, for this one (and a few others) the hexagon goes over the edge of the foundation so just stop sewing when you reach the edge. Make sure to smooth out your hexagon and to keep the edges of the hexie flat as you sew.
Align your next hexie so that it's top edge is butting against the bottom edge of the one you've just sewn. Sew all the way around.
Repeat the steps above until you have your entire muslin covered. For the smaller areas of blank space left on the left hand side of the coaster, trim some excess off of a hexagon you've already attached - once all of the hexies are sewn on you will see this excess, just use the edge of the muslin as a guide (so sorry that I forgot to take pictures of this step) - sew this excess onto the small blank spaces. Most of these small spaces will be covered by the binding, but it's always best to fill in as much as possible.
Evenly trim your coaster down to 4.5" square - this would mean trimming your coaster down about 1/4" on all four sides, but be careful since the coaster may have shrunk slightly with the quilting.
Use the binding strip that you have set aside and bind as desired. I did it the "traditional" way by machine sewing the front side, then folding over and hand sewing the back, but you could machine sew the whole thing on if you wanted! And see all of the pretty quilting that shows on the back from sewing around the hexagons - ohhh yaaaa!
Grab yourself a drink and enjoy! Anne of Green Gables mug totally optional of course but I would highly recommend it *wink*!
So what do y'all think? I really hope you liked this tutorial and if you have any questions, please feel free to ask. Be sure to send me pictures or add them to the Flickr group if you do make a hexie coaster or two using this tutorial!
Monday, July 9, 2012
Flip-Pal Sleeve + the Giveaway Winner
Hey all! How's everyone doing? I've been away for a few days visiting my mum and grandparents, but now I'm back and can finally do this post since I have my computer back and have gotten most everything transferred back on to it - hurray!
One of my big plans while visiting my grandparents was to take my Flip-Pal and scan some of our older family pictures. So, of course, I needed to make it a travel case!
The Flip-Pal is larger than most of the tablet/reader cozy patterns available so I made up my own, but was inspired to add the pocket by Ann Kelle's iPad sleeve tutorial.
Aside from the linen that I used for the outer shell, all of the fabrics used are Heather Ross. I thought it would be fun to use some of the hexagons I had lying arund for embellishment - the big ones were made by me and the two teeny one came to me by Jo as part of the Handsome Hexies swap on Flickr.
I also made the 3/4" button for the closure using a little fussy cut mushroom from some of the Heather Ross gnomes munki munki.
The sleeve came out a teensy bit bigger than I meant it to but hey, that's better than being too small! I bound the top of the pocket using some Heather Ross that I fussy cut and also added a little loop for hanging the USB/SD card reader that holds my photo software.
The lining is, yet again, Heather Ross from the West Hill collection (you can see the scallop here that I fussy cut for the pocket binding). I love this - it just make me so super-happy to have pretty things to carry my stuff around it!
So I guess you want to know who won the Generation Q magazine giveaway, right? Well, without further ado the winner is...
Congratulations Becca! Please email me with with your address and we'll get your magazine out!
One of my big plans while visiting my grandparents was to take my Flip-Pal and scan some of our older family pictures. So, of course, I needed to make it a travel case!
The Flip-Pal is larger than most of the tablet/reader cozy patterns available so I made up my own, but was inspired to add the pocket by Ann Kelle's iPad sleeve tutorial.
Aside from the linen that I used for the outer shell, all of the fabrics used are Heather Ross. I thought it would be fun to use some of the hexagons I had lying arund for embellishment - the big ones were made by me and the two teeny one came to me by Jo as part of the Handsome Hexies swap on Flickr.
I also made the 3/4" button for the closure using a little fussy cut mushroom from some of the Heather Ross gnomes munki munki.
The sleeve came out a teensy bit bigger than I meant it to but hey, that's better than being too small! I bound the top of the pocket using some Heather Ross that I fussy cut and also added a little loop for hanging the USB/SD card reader that holds my photo software.
The lining is, yet again, Heather Ross from the West Hill collection (you can see the scallop here that I fussy cut for the pocket binding). I love this - it just make me so super-happy to have pretty things to carry my stuff around it!
So I guess you want to know who won the Generation Q magazine giveaway, right? Well, without further ado the winner is...
Becca of Our Busy Little Bunch
Congratulations Becca! Please email me with with your address and we'll get your magazine out!
Thursday, June 28, 2012
Make the most of yourself, for that is all there is of you. -Ralph Waldo Emerson
Happy Thursday everyone! I made a few things over the last little bit that I haven't had a chance to show you yet, so let's get to it!
These are my June blocks for the Joy circle of do. Good Stitches. We used the Patchwork Wheel tutorial from Elizabeth of Don't Call Me Betsy and I think they turned out quite nice. I used a mix of prints for these including quite a few from Tula Pink, some Kate Spain, some Heather Bailey, solids, and a few more designers.
I have more (read: better) pictures of them, but unfortunately they are on my computer which is in the shop after the hard drive melt-down. Luckily I take a lot of pictures on my phone to share on Instagram while I'm working on things so at least I have this one to show! By the way, if you're on Instagram and want to find me my name username is KayePrince.
I finished my Diagonal Lace Socks a couple of weeks ago and I just love the way they turned out! The pattern is from Wendy Johnson's Socks From the Toe Up but it is also available on Wendy's blog as one of her (many) free downloadable patterns. The yarn I used is from an indie dye, Aspen Moon Arts, on Etsy; it's 70% superwash wool and 30% nylon, and the colourway is called Harvest Corn. These are the second pair of socks I've knit but they were a first in many ways - my first using the toe up method, my first using magic loop, and my first actually using fingering weight yarn (the first pair were super-chunky). Yes, I am quite pleased with them.
I also stitched up this little guy just for fun! The Royal Guard was first published in Cross Stitcher magazine last year but can now be found as a download on The Making Spot (if you have not checked out that website, run and look - seriously!). I have no idea how I'm going to use him yet, but I had a ton of fun just stitching him up! I stitched up another little giftie for my mum this week but it'll have to wait until after I give it to her because she reads my blog (hi Mum!).
And finally, I started a new pair of socks yesterday and this is the yarn I'm using. It's Madelinetosh Tosh Sock in Iceburg (which is a colourway that has been discontinued); I'm using the Feather Lace pattern from Rosemary Falk, and am super-excited that they are less-than-standard stitches around so I think they'll fit my super-narrow feet better! I will show my progress when I've got a little more going.
I am now going to go read a book or watch You've Got Mail (in honour of Nora Ephron) in bed since I got stung by a stupid, ruddy bee today in the sole of my foot (while wearing my bloody shoes!) and need a lie down. Poor foot. Rubbish bee.
LinkConnector Validation
These are my June blocks for the Joy circle of do. Good Stitches. We used the Patchwork Wheel tutorial from Elizabeth of Don't Call Me Betsy and I think they turned out quite nice. I used a mix of prints for these including quite a few from Tula Pink, some Kate Spain, some Heather Bailey, solids, and a few more designers.
I have more (read: better) pictures of them, but unfortunately they are on my computer which is in the shop after the hard drive melt-down. Luckily I take a lot of pictures on my phone to share on Instagram while I'm working on things so at least I have this one to show! By the way, if you're on Instagram and want to find me my name username is KayePrince.
I finished my Diagonal Lace Socks a couple of weeks ago and I just love the way they turned out! The pattern is from Wendy Johnson's Socks From the Toe Up but it is also available on Wendy's blog as one of her (many) free downloadable patterns. The yarn I used is from an indie dye, Aspen Moon Arts, on Etsy; it's 70% superwash wool and 30% nylon, and the colourway is called Harvest Corn. These are the second pair of socks I've knit but they were a first in many ways - my first using the toe up method, my first using magic loop, and my first actually using fingering weight yarn (the first pair were super-chunky). Yes, I am quite pleased with them.
I also stitched up this little guy just for fun! The Royal Guard was first published in Cross Stitcher magazine last year but can now be found as a download on The Making Spot (if you have not checked out that website, run and look - seriously!). I have no idea how I'm going to use him yet, but I had a ton of fun just stitching him up! I stitched up another little giftie for my mum this week but it'll have to wait until after I give it to her because she reads my blog (hi Mum!).
And finally, I started a new pair of socks yesterday and this is the yarn I'm using. It's Madelinetosh Tosh Sock in Iceburg (which is a colourway that has been discontinued); I'm using the Feather Lace pattern from Rosemary Falk, and am super-excited that they are less-than-standard stitches around so I think they'll fit my super-narrow feet better! I will show my progress when I've got a little more going.
I am now going to go read a book or watch You've Got Mail (in honour of Nora Ephron) in bed since I got stung by a stupid, ruddy bee today in the sole of my foot (while wearing my bloody shoes!) and need a lie down. Poor foot. Rubbish bee.
LinkConnector Validation
Monday, June 25, 2012
Generation Q Review + Giveaway!
Hey all! Are you ready for the first stop on the Generation Q Magazine blog tour? Do you like giveaways? If you answered yes to either question (or a big double-yes for the pair) then you are in the right place! Remember, that this is just the first stop on the tour/giveaway spree - the full list of participants and dates can be found here over at GenQ.
I originally intended to have this post up earlier in the day but my hard drive crashed this morning (oy!) and now needs to be replaced - I am currently using Alex's old laptop but it is slow going (obviously Alex replaced this one for a reason). In all honesty, I've actually been trying to post a different blog post since Thursday but my computer wouldn't let me - this morning it just bit the bucket entirely (mixed-metaphor, what!).
Generation Q is a brand-new print magazine from the wonderful people at the GenQ BlogZine - it is bursting with fun, fresh, and creative ideas, awesome interviews, reviews, and feisty commentary.
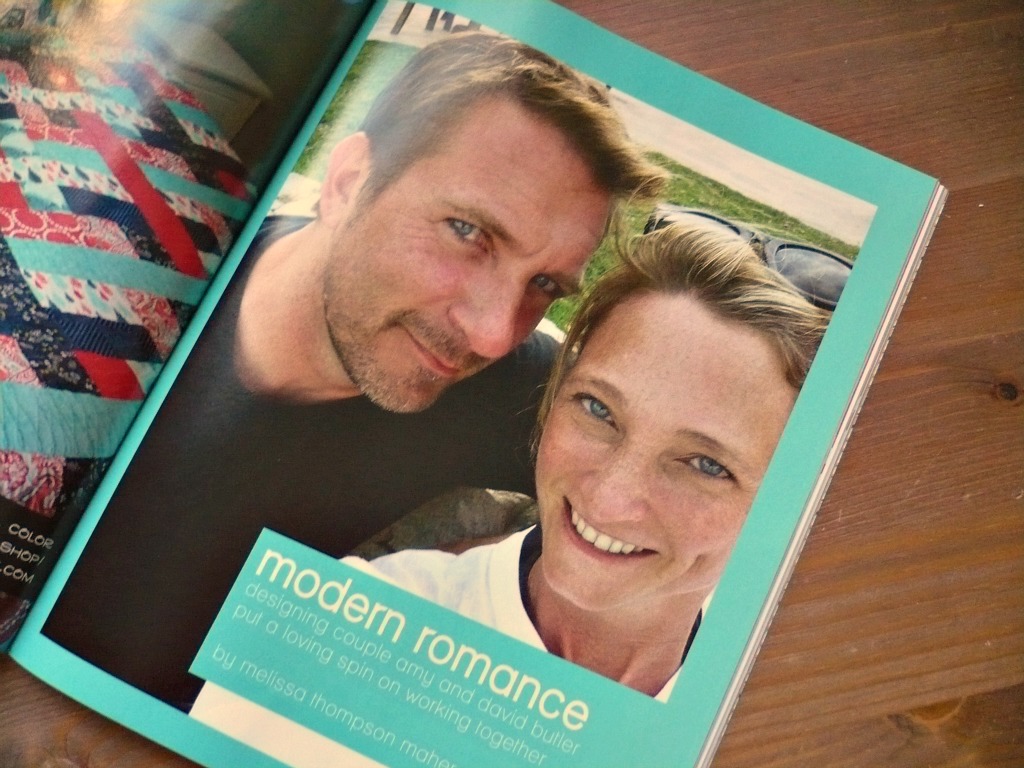
I received my copy of the first issue in the mail on Friday as part of my little "bribe" for backing the Kickstarter campaign a few months ago, haha! Don't Amy and David Butler look all cozy there snuggled up in a quilt designed by Scott?
Let's talk a little about the outside first, shall we? It is quite nice and compact measuring 7x9" rather than the standard 8.5x11" (or so) - it is very neat! I like the more compact size because it makes it easier to throw into a purse or tote for travel reading without having to worry about wrinkling up the cover or folding it to fit. The cover is glossy and eye-catching, and the paper has a nice feel.
Now let's open it up! And just so that you know, I'm trying hard not to give away too much of the interior content with my pictures here, so you're not getting to see all of the really good stuff! You'll need to get your own for that *wink*.
Oh, look there's me! Haha, sorry, I just has to put that it there (this is the lovely list at the front of this issue thanking everyone who helped to back the Kickstarter campaign). Anywho...
One of the first elements that really caught my eye was the Block Builder feature. In each issue there will be a "starter" block which will be used by the participants to create a quilt block. In this issue the awesome peeps over at Fat Quarterly were invited to use the starter block shown in the picture to create a block design; there are five designs spread over three pages and Brioni's take is shown above. As well, each issue features a new starter block and invites readers to create a block with it which can than be submitted and possibly featured in the next issue. I think that's pretty fun!
This issue also features a fun and fresh interview and studio/home tour with Amy and David Butler - the pictures are lovely and learning more about their lives and art was great.
On top of other great product reviews, gift ideas, fun commentary and articles, the magazine also features patterns! We all love patterns, don't we? Here's just a little taste...
This is the full view of Scott's quilt, Hugs and Kisses No. 9, which was also featured on the cover. Scott's quilt features a number of different blocks in different sizes and the really wonderful thing about this pattern is that there are step-by-step diagrams for making each and every block, along with written instructions. There are also notes for each block on using scraps to create the different values and achieve the same effect.
Along with Scott, this issue also features patterns from Julie Herman, Melissa Peda, Heather Jones, Pat Bravo, and the info on getting an exclusive downloadable pattern from Rashida Coleman-Hale.
Really it's fabulous! And no, I'm not just saying that because they asked me to do a review, I am so so so proud of Jake, Melissa, Scott, Megan, and everybody else who helped to put this magazine together. They should all be very proud of themselves.
So I guess you want to now a little bit more about the giveaway then, eh? Well, step right up and enter to win your very own print copy of the magazine! You have two ways to enter here, and also if you want another chance you can "like" GenQ on Facebook and get entered to win over there too (however, liking on Facebook, will do nothing to help your chances here). Here's what you need to do for your two chances:
I originally intended to have this post up earlier in the day but my hard drive crashed this morning (oy!) and now needs to be replaced - I am currently using Alex's old laptop but it is slow going (obviously Alex replaced this one for a reason). In all honesty, I've actually been trying to post a different blog post since Thursday but my computer wouldn't let me - this morning it just bit the bucket entirely (mixed-metaphor, what!).
Generation Q is a brand-new print magazine from the wonderful people at the GenQ BlogZine - it is bursting with fun, fresh, and creative ideas, awesome interviews, reviews, and feisty commentary.
I received my copy of the first issue in the mail on Friday as part of my little "bribe" for backing the Kickstarter campaign a few months ago, haha! Don't Amy and David Butler look all cozy there snuggled up in a quilt designed by Scott?
Let's talk a little about the outside first, shall we? It is quite nice and compact measuring 7x9" rather than the standard 8.5x11" (or so) - it is very neat! I like the more compact size because it makes it easier to throw into a purse or tote for travel reading without having to worry about wrinkling up the cover or folding it to fit. The cover is glossy and eye-catching, and the paper has a nice feel.
Now let's open it up! And just so that you know, I'm trying hard not to give away too much of the interior content with my pictures here, so you're not getting to see all of the really good stuff! You'll need to get your own for that *wink*.
Oh, look there's me! Haha, sorry, I just has to put that it there (this is the lovely list at the front of this issue thanking everyone who helped to back the Kickstarter campaign). Anywho...
One of the first elements that really caught my eye was the Block Builder feature. In each issue there will be a "starter" block which will be used by the participants to create a quilt block. In this issue the awesome peeps over at Fat Quarterly were invited to use the starter block shown in the picture to create a block design; there are five designs spread over three pages and Brioni's take is shown above. As well, each issue features a new starter block and invites readers to create a block with it which can than be submitted and possibly featured in the next issue. I think that's pretty fun!
This issue also features a fun and fresh interview and studio/home tour with Amy and David Butler - the pictures are lovely and learning more about their lives and art was great.
On top of other great product reviews, gift ideas, fun commentary and articles, the magazine also features patterns! We all love patterns, don't we? Here's just a little taste...
This is the full view of Scott's quilt, Hugs and Kisses No. 9, which was also featured on the cover. Scott's quilt features a number of different blocks in different sizes and the really wonderful thing about this pattern is that there are step-by-step diagrams for making each and every block, along with written instructions. There are also notes for each block on using scraps to create the different values and achieve the same effect.
Along with Scott, this issue also features patterns from Julie Herman, Melissa Peda, Heather Jones, Pat Bravo, and the info on getting an exclusive downloadable pattern from Rashida Coleman-Hale.
Really it's fabulous! And no, I'm not just saying that because they asked me to do a review, I am so so so proud of Jake, Melissa, Scott, Megan, and everybody else who helped to put this magazine together. They should all be very proud of themselves.
So I guess you want to now a little bit more about the giveaway then, eh? Well, step right up and enter to win your very own print copy of the magazine! You have two ways to enter here, and also if you want another chance you can "like" GenQ on Facebook and get entered to win over there too (however, liking on Facebook, will do nothing to help your chances here). Here's what you need to do for your two chances:
1. Tell me what you would most like to see from a new print quilting/sewing/crafty magazine.
Are there specific people you'd like to see interviewed, specific types of patterns? Anything goes!
2. Leave another comment if you are a follower of my blog.
Two easy-peasy ways to enter, just make sure that you leave a comment for each entry (if you combine both into one I can only count it as one). I will close the comments in a week (on July 2nd) and announce
the winner here on the blog. International entries are, as always,
welcome! Any duplicate comments will be deleted.
*the giveaway is now closed*
Subscribe to:
Posts (Atom)