When the new Divine fabric by Rosemarie Lavin arrived from Windham a couple of weeks ago I decided that it was the perfect opportunity to write up a small tutorial that I had been thinking about - so here it is! This little mini can be used either as a tabletopper or as a mini quilt with the addition of some hangers on the back (here's a great tutorial from Aneela on adding embroidered hanging loops to a quilt). Okay, are you ready? Let's go!
Materials:
8 (eight) Divine charm squares (5x5")
1/2 yard of Essex linen/cotton blend in Natural
1/2 yard backing fabric
1/2 yard quilt batting
*All seams are 1/4" unless otherwise stated.
Cutting Directions:
From your Essex fabric cut eight 5x5" squares, two 3"xWOF strips, and two 2.25"xWOF strips for binding. I like to cut my binding strips at 2.25" but feel free to cut them at whatever width you like. Subcut the 3"xWOF strips into two 3x20.5" strips and two 3x15.5" strips for borders.
Half Square Triangle Directions:
Pair off each charm square with one 5" square of Essex. Repeat the following directions for each of these pairs.
Place your two squares right sides together.
Sew a quarter inch seam around all four sides.
Slice the square twice diagonally so that your end up with four triangles.
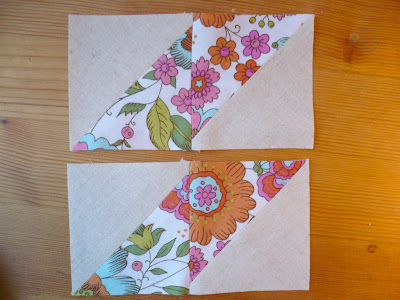
Press your seams flat and trim every HST down to 3" square being sure to cut off the little ears as you go.
Matching Zig Zag Assembly Directions:
Lay out your HSTs as shown in the picture above.
Work with matching pieces one set at a time. Repeat the following directions for all sets.
Sew side-by-side squares together right sides together and press.
Sew centre seam right sides together and press to form your final square.
Final Assembly Instructions:
Select the top four sewn-up sets from you centre panel.
Sew side-by-side sets, right sides together and press.
Sew the centre seam, right sides together and press.
Repeat the above steps for the second grouping of four sets. Seam up these two finished squares right sides together and press.
Take the two 3x20.5" strips of Essex that you cut earlier and sew one, right sides together, to each long side of the centre panel. Press. Now take the two 3x15.5" strips that you cut and sew one, right sides together, to each short side of the centre panel.
Sandwich, Baste, Quilt, and Bind and you're done!!


So cute! Love the way you quilted it! :)
ReplyDeleteThanks for sharing!
ReplyDeleteVanree
Great tutorial , thank you!
ReplyDeleteCute! It's so bright and cheery. :)
ReplyDeleteSo cute!!! Thanks for the tutorial!!
ReplyDeleteSo pretty, and looks pretty easy to do, may be perfect for an upcoming swap, thank you :o)
ReplyDeletethe fabric looks great!!
ReplyDeleteTotally cute, Kaye!
ReplyDeletethis method for creating the triangle leaves the bias edge to be sewn to each other. Technically this is the quarter square triangle, not the half square triangle. It looks the same but doesn't sew the same.
ReplyDeleteI do like your table runner, bright and cheery!
I love HST and this one is a keeper. Thanks for sharing.
ReplyDeleteThanks for a great tutorial. I just made one and I love it.
ReplyDelete