Happy Thursday everyone! I made a few things over the last little bit that I haven't had a chance to show you yet, so let's get to it!
These are my June blocks for the Joy circle of do. Good Stitches. We used the Patchwork Wheel tutorial from Elizabeth of Don't Call Me Betsy and I think they turned out quite nice. I used a mix of prints for these including quite a few from Tula Pink, some Kate Spain, some Heather Bailey, solids, and a few more designers.
I have more (read: better) pictures of them, but unfortunately they are on my computer which is in the shop after the hard drive melt-down. Luckily I take a lot of pictures on my phone to share on Instagram while I'm working on things so at least I have this one to show! By the way, if you're on Instagram and want to find me my name username is KayePrince.
I finished my Diagonal Lace Socks a couple of weeks ago and I just love the way they turned out! The pattern is from Wendy Johnson's Socks From the Toe Up but it is also available on Wendy's blog as one of her (many) free downloadable patterns. The yarn I used is from an indie dye, Aspen Moon Arts, on Etsy; it's 70% superwash wool and 30% nylon, and the colourway is called Harvest Corn. These are the second pair of socks I've knit but they were a first in many ways - my first using the toe up method, my first using magic loop, and my first actually using fingering weight yarn (the first pair were super-chunky). Yes, I am quite pleased with them.
I also stitched up this little guy just for fun! The Royal Guard was first published in Cross Stitcher magazine last year but can now be found as a download on The Making Spot (if you have not checked out that website, run and look - seriously!). I have no idea how I'm going to use him yet, but I had a ton of fun just stitching him up! I stitched up another little giftie for my mum this week but it'll have to wait until after I give it to her because she reads my blog (hi Mum!).
And finally, I started a new pair of socks yesterday and this is the yarn I'm using. It's Madelinetosh Tosh Sock in Iceburg (which is a colourway that has been discontinued); I'm using the Feather Lace pattern from Rosemary Falk, and am super-excited that they are less-than-standard stitches around so I think they'll fit my super-narrow feet better! I will show my progress when I've got a little more going.
I am now going to go read a book or watch You've Got Mail (in honour of Nora Ephron) in bed since I got stung by a stupid, ruddy bee today in the sole of my foot (while wearing my bloody shoes!) and need a lie down. Poor foot. Rubbish bee.
LinkConnector Validation
Thursday, June 28, 2012
Monday, June 25, 2012
Generation Q Review + Giveaway!
Hey all! Are you ready for the first stop on the Generation Q Magazine blog tour? Do you like giveaways? If you answered yes to either question (or a big double-yes for the pair) then you are in the right place! Remember, that this is just the first stop on the tour/giveaway spree - the full list of participants and dates can be found here over at GenQ.
I originally intended to have this post up earlier in the day but my hard drive crashed this morning (oy!) and now needs to be replaced - I am currently using Alex's old laptop but it is slow going (obviously Alex replaced this one for a reason). In all honesty, I've actually been trying to post a different blog post since Thursday but my computer wouldn't let me - this morning it just bit the bucket entirely (mixed-metaphor, what!).
Generation Q is a brand-new print magazine from the wonderful people at the GenQ BlogZine - it is bursting with fun, fresh, and creative ideas, awesome interviews, reviews, and feisty commentary.
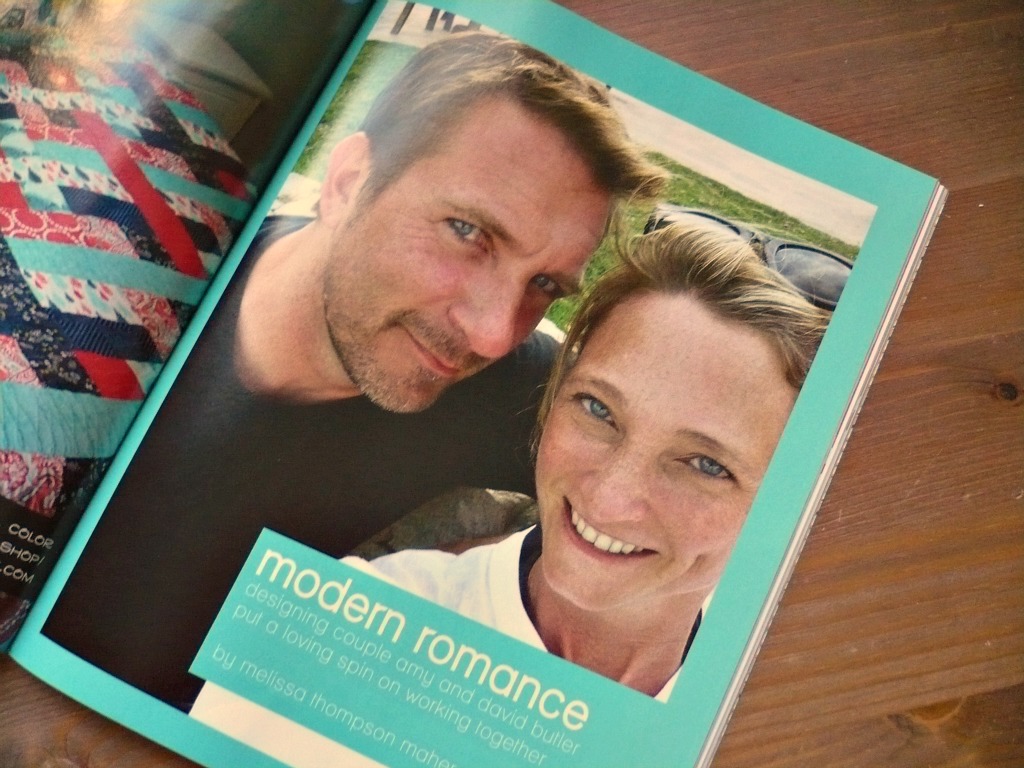
I received my copy of the first issue in the mail on Friday as part of my little "bribe" for backing the Kickstarter campaign a few months ago, haha! Don't Amy and David Butler look all cozy there snuggled up in a quilt designed by Scott?
Let's talk a little about the outside first, shall we? It is quite nice and compact measuring 7x9" rather than the standard 8.5x11" (or so) - it is very neat! I like the more compact size because it makes it easier to throw into a purse or tote for travel reading without having to worry about wrinkling up the cover or folding it to fit. The cover is glossy and eye-catching, and the paper has a nice feel.
Now let's open it up! And just so that you know, I'm trying hard not to give away too much of the interior content with my pictures here, so you're not getting to see all of the really good stuff! You'll need to get your own for that *wink*.
Oh, look there's me! Haha, sorry, I just has to put that it there (this is the lovely list at the front of this issue thanking everyone who helped to back the Kickstarter campaign). Anywho...
One of the first elements that really caught my eye was the Block Builder feature. In each issue there will be a "starter" block which will be used by the participants to create a quilt block. In this issue the awesome peeps over at Fat Quarterly were invited to use the starter block shown in the picture to create a block design; there are five designs spread over three pages and Brioni's take is shown above. As well, each issue features a new starter block and invites readers to create a block with it which can than be submitted and possibly featured in the next issue. I think that's pretty fun!
This issue also features a fun and fresh interview and studio/home tour with Amy and David Butler - the pictures are lovely and learning more about their lives and art was great.
On top of other great product reviews, gift ideas, fun commentary and articles, the magazine also features patterns! We all love patterns, don't we? Here's just a little taste...
This is the full view of Scott's quilt, Hugs and Kisses No. 9, which was also featured on the cover. Scott's quilt features a number of different blocks in different sizes and the really wonderful thing about this pattern is that there are step-by-step diagrams for making each and every block, along with written instructions. There are also notes for each block on using scraps to create the different values and achieve the same effect.
Along with Scott, this issue also features patterns from Julie Herman, Melissa Peda, Heather Jones, Pat Bravo, and the info on getting an exclusive downloadable pattern from Rashida Coleman-Hale.
Really it's fabulous! And no, I'm not just saying that because they asked me to do a review, I am so so so proud of Jake, Melissa, Scott, Megan, and everybody else who helped to put this magazine together. They should all be very proud of themselves.
So I guess you want to now a little bit more about the giveaway then, eh? Well, step right up and enter to win your very own print copy of the magazine! You have two ways to enter here, and also if you want another chance you can "like" GenQ on Facebook and get entered to win over there too (however, liking on Facebook, will do nothing to help your chances here). Here's what you need to do for your two chances:
I originally intended to have this post up earlier in the day but my hard drive crashed this morning (oy!) and now needs to be replaced - I am currently using Alex's old laptop but it is slow going (obviously Alex replaced this one for a reason). In all honesty, I've actually been trying to post a different blog post since Thursday but my computer wouldn't let me - this morning it just bit the bucket entirely (mixed-metaphor, what!).
Generation Q is a brand-new print magazine from the wonderful people at the GenQ BlogZine - it is bursting with fun, fresh, and creative ideas, awesome interviews, reviews, and feisty commentary.
I received my copy of the first issue in the mail on Friday as part of my little "bribe" for backing the Kickstarter campaign a few months ago, haha! Don't Amy and David Butler look all cozy there snuggled up in a quilt designed by Scott?
Let's talk a little about the outside first, shall we? It is quite nice and compact measuring 7x9" rather than the standard 8.5x11" (or so) - it is very neat! I like the more compact size because it makes it easier to throw into a purse or tote for travel reading without having to worry about wrinkling up the cover or folding it to fit. The cover is glossy and eye-catching, and the paper has a nice feel.
Now let's open it up! And just so that you know, I'm trying hard not to give away too much of the interior content with my pictures here, so you're not getting to see all of the really good stuff! You'll need to get your own for that *wink*.
Oh, look there's me! Haha, sorry, I just has to put that it there (this is the lovely list at the front of this issue thanking everyone who helped to back the Kickstarter campaign). Anywho...
One of the first elements that really caught my eye was the Block Builder feature. In each issue there will be a "starter" block which will be used by the participants to create a quilt block. In this issue the awesome peeps over at Fat Quarterly were invited to use the starter block shown in the picture to create a block design; there are five designs spread over three pages and Brioni's take is shown above. As well, each issue features a new starter block and invites readers to create a block with it which can than be submitted and possibly featured in the next issue. I think that's pretty fun!
This issue also features a fun and fresh interview and studio/home tour with Amy and David Butler - the pictures are lovely and learning more about their lives and art was great.
On top of other great product reviews, gift ideas, fun commentary and articles, the magazine also features patterns! We all love patterns, don't we? Here's just a little taste...
This is the full view of Scott's quilt, Hugs and Kisses No. 9, which was also featured on the cover. Scott's quilt features a number of different blocks in different sizes and the really wonderful thing about this pattern is that there are step-by-step diagrams for making each and every block, along with written instructions. There are also notes for each block on using scraps to create the different values and achieve the same effect.
Along with Scott, this issue also features patterns from Julie Herman, Melissa Peda, Heather Jones, Pat Bravo, and the info on getting an exclusive downloadable pattern from Rashida Coleman-Hale.
Really it's fabulous! And no, I'm not just saying that because they asked me to do a review, I am so so so proud of Jake, Melissa, Scott, Megan, and everybody else who helped to put this magazine together. They should all be very proud of themselves.
So I guess you want to now a little bit more about the giveaway then, eh? Well, step right up and enter to win your very own print copy of the magazine! You have two ways to enter here, and also if you want another chance you can "like" GenQ on Facebook and get entered to win over there too (however, liking on Facebook, will do nothing to help your chances here). Here's what you need to do for your two chances:
1. Tell me what you would most like to see from a new print quilting/sewing/crafty magazine.
Are there specific people you'd like to see interviewed, specific types of patterns? Anything goes!
2. Leave another comment if you are a follower of my blog.
Two easy-peasy ways to enter, just make sure that you leave a comment for each entry (if you combine both into one I can only count it as one). I will close the comments in a week (on July 2nd) and announce
the winner here on the blog. International entries are, as always,
welcome! Any duplicate comments will be deleted.
*the giveaway is now closed*
Thursday, June 7, 2012
A New Cross Stitch Pattern + the Giveaway Winner!!
Hey everyone, how y'all doing? I am very excited to announce that I have a new cross stitch pattern available! In a way two actually, but we'll get to that in a bit! Without further ado, I give you...
Let's Get Baked! Let's Get Baked is a fun cross stitch pattern featuring a vintage-y mixer, some cherry pie and a few other little accoutrements!
On 14 count aida, it finishes at approximately 5.5x8" and is available in both my Etsy Shop and my Craftsy pattern shop.
The other pseudo-new (but not actually) pattern is...
Itching to be Stitching! Yes, I know you've seen this little baby before, but... it's been discontinued by The Frosted Pumpkin Stitchery on account of them welcoming a new guest designer this week (don't worry, no drama or anything, we're all still friends). So now I'm re-releasing it in my own shops (Etsy and Craftsy) with a whole new cover and lay-out! Woot, good times!
So, about this whole two shops thing - yes, the patterns are available through both and here's the deal. Lots of people have Etsy accounts and I already have a shop there, but Craftsy allows the user to download the pattern automatically (with Etsy you'll have to wait for me to email it to you), allows them to keep it in their library, and they don't charge me any fees to sell through them. So feel free, if you're going to that is, to purchase the pattern from either place!
Well now, I bet you're wondering who won the giveaway, right?
Congratulations Bobbi!! Please email me with your details and FQS will get your bundle shipped out.
*And just as I was about to hit post, Alex calls me from the hospital saying that he got a cleat to the head at Frisbee and needs stitches, so I'm on my way to the hospital! Don't worry, he seems fine, but I gotta go!
Let's Get Baked! Let's Get Baked is a fun cross stitch pattern featuring a vintage-y mixer, some cherry pie and a few other little accoutrements!
On 14 count aida, it finishes at approximately 5.5x8" and is available in both my Etsy Shop and my Craftsy pattern shop.
The other pseudo-new (but not actually) pattern is...
Itching to be Stitching! Yes, I know you've seen this little baby before, but... it's been discontinued by The Frosted Pumpkin Stitchery on account of them welcoming a new guest designer this week (don't worry, no drama or anything, we're all still friends). So now I'm re-releasing it in my own shops (Etsy and Craftsy) with a whole new cover and lay-out! Woot, good times!
So, about this whole two shops thing - yes, the patterns are available through both and here's the deal. Lots of people have Etsy accounts and I already have a shop there, but Craftsy allows the user to download the pattern automatically (with Etsy you'll have to wait for me to email it to you), allows them to keep it in their library, and they don't charge me any fees to sell through them. So feel free, if you're going to that is, to purchase the pattern from either place!
Well now, I bet you're wondering who won the giveaway, right?
Congratulations Bobbi!! Please email me with your details and FQS will get your bundle shipped out.
*And just as I was about to hit post, Alex calls me from the hospital saying that he got a cleat to the head at Frisbee and needs stitches, so I'm on my way to the hospital! Don't worry, he seems fine, but I gotta go!
Monday, June 4, 2012
Desperate Housewife's Quilt - Chevron Fly
Hey all! Thanks so much for joining me for my stop on Jane's Desperate Housewife's Quilt and in case you missed it (or this is your first time here) my giveaway for Heather's Blogger's Choice Bundle is still open here (until June 7th)!
So, what is going on here you might be wondering? Well, Jane of QuiltJane is posting one tutorial a week for 50 weeks for an 8" finished block, as well she's invited other bloggers to contribute a tutorial for a block for each of those 50 weeks for a grand total of 100 blocks! It's pretty fun!
So this is my week - week 48 - and I've got an original block tutorial for you! I'm calling this little baby Chevron Fly and I really hope you like it!
Alright, you ready? Let's go!!!
Materials:
- 8 print squares, two of each print, measuring 2x2"
- 8 solid squares (I used Kona Charcoal), measuring 2x2"
- 1.5x8.5" solid strip
- 5.5x8.5" solid rectangle
Notes: All seams are 1/4" unless otherwise specified. Press seams in between each step.
Making the HSTs:
-Draw a line diagonally from point to point on the wrong side of two matching printed squares.
-Pin a print square, right sides together, with a solid square and sew 1/4" away on either side of the diagonal line. Repeat with other matching print square and a solid square.
-Using your rotary cutter or a pair of scissors cut each square into two triangular pieces using the original line that you drew as your guide.
-Open up each HST and press the centre seam open. Trim each block if necessary to 1.5x1.5" square and cut off the little nubbins that are jutting out.
-Line up your four matching HSTs as shown in the picture above.
-Sew the top two blocks and bottom two blocks together as shown above. Join together to form the finished chevron.
-Repeat the above steps with your remaining printed and solid squares.
Finishing:
-Sew the four chevron units together to form a long strip.
-Line up your solid strip, chevron strip, and solid rectangle as shown above and sew together.
And you're done! I hope you like my Chevron Fly block and be sure to check out the rest of the block's over at Jane's blog!
If you're on Flickr please be sure to add a picture of your completed block to the Desperate Housewife's Quilt group, and also to my own Tutorials and Patterns group over there!
So, what is going on here you might be wondering? Well, Jane of QuiltJane is posting one tutorial a week for 50 weeks for an 8" finished block, as well she's invited other bloggers to contribute a tutorial for a block for each of those 50 weeks for a grand total of 100 blocks! It's pretty fun!
So this is my week - week 48 - and I've got an original block tutorial for you! I'm calling this little baby Chevron Fly and I really hope you like it!
Alright, you ready? Let's go!!!
Materials:
- 8 print squares, two of each print, measuring 2x2"
- 8 solid squares (I used Kona Charcoal), measuring 2x2"
- 1.5x8.5" solid strip
- 5.5x8.5" solid rectangle
Notes: All seams are 1/4" unless otherwise specified. Press seams in between each step.
Making the HSTs:
-Draw a line diagonally from point to point on the wrong side of two matching printed squares.
-Pin a print square, right sides together, with a solid square and sew 1/4" away on either side of the diagonal line. Repeat with other matching print square and a solid square.
-Using your rotary cutter or a pair of scissors cut each square into two triangular pieces using the original line that you drew as your guide.
-Open up each HST and press the centre seam open. Trim each block if necessary to 1.5x1.5" square and cut off the little nubbins that are jutting out.
-Line up your four matching HSTs as shown in the picture above.
-Sew the top two blocks and bottom two blocks together as shown above. Join together to form the finished chevron.
-Repeat the above steps with your remaining printed and solid squares.
Finishing:
-Sew the four chevron units together to form a long strip.
-Line up your solid strip, chevron strip, and solid rectangle as shown above and sew together.
And you're done! I hope you like my Chevron Fly block and be sure to check out the rest of the block's over at Jane's blog!
If you're on Flickr please be sure to add a picture of your completed block to the Desperate Housewife's Quilt group, and also to my own Tutorials and Patterns group over there!
Block Title: Chevron Fly
Desperate Housewife's Quilt Week 48
Finished Size: 8"
Thursday, May 31, 2012
It's Giveaway Time - Heather Bostic's Blogger's Choice!
First off, I just wanted to thank everyone for the thought provoking comments left on the last post! It was really great to read your own thoughts on the subject and I was right - some agreed, some didn't, and some half-did! I've spent the past two days responding to comments via email, so unless you were a no-reply blogger or didn't leave your email, you should have received an email response back from me!
Now onto the giveaway!! Once again, the lovely folks at Fat Quarter Shop and I have teamed up to bring you a super-awesome giveaway! This time around we're giving away Heather Bostic's Blogger's Choice Fat Quarter Bundle - woot!
This particular bundle was put together by none other than the incomparable and super-awesome (and also sailor-mouthed) Heather Bostic of {House} of A La Mode fame! This bundle features six prints from Tula Pink's Nightshade, six prints from Northcott's Saville Row (Northcott is Canadian by the way in case you were wondering - woot!), and three Kona solids.
Seriously guys, I love Heather's bundle and I want it bad (to be completely truthful, I want all of the Nightshade collection too to make a really fun quilt just for myself)! I think the colour palette that Heather has gone for here is very sophisticated, but also unexpected and fun with Tula's hidden imagery.
Okay, so I guess you want to know how to enter, right? You have two chances but please be sure to leave separate comments for each entry. Here's what you've got to do:
Now onto the giveaway!! Once again, the lovely folks at Fat Quarter Shop and I have teamed up to bring you a super-awesome giveaway! This time around we're giving away Heather Bostic's Blogger's Choice Fat Quarter Bundle - woot!
This particular bundle was put together by none other than the incomparable and super-awesome (and also sailor-mouthed) Heather Bostic of {House} of A La Mode fame! This bundle features six prints from Tula Pink's Nightshade, six prints from Northcott's Saville Row (Northcott is Canadian by the way in case you were wondering - woot!), and three Kona solids.
Seriously guys, I love Heather's bundle and I want it bad (to be completely truthful, I want all of the Nightshade collection too to make a really fun quilt just for myself)! I think the colour palette that Heather has gone for here is very sophisticated, but also unexpected and fun with Tula's hidden imagery.
Okay, so I guess you want to know how to enter, right? You have two chances but please be sure to leave separate comments for each entry. Here's what you've got to do:
1. Leave a comment letting my know which item (fabric, pattern, bundle, etc)
is your favourite from FQS' Coming Soon page.
2. Leave another comment if you are a follower of my blog.
That's it! Two easy-peasy ways to enter! I will close the comments in a week (on June 7th) and announce the winner here on the blog. International entries are, as always, welcome! Also, please remember that I have comment moderation enabled so if you don't see your comment right away it just means that I haven't had the chance to approve it yet (duplicate comments will be deleted).
2. Leave another comment if you are a follower of my blog.
That's it! Two easy-peasy ways to enter! I will close the comments in a week (on June 7th) and announce the winner here on the blog. International entries are, as always, welcome! Also, please remember that I have comment moderation enabled so if you don't see your comment right away it just means that I haven't had the chance to approve it yet (duplicate comments will be deleted).
*the giveaway is now closed*
Tuesday, May 29, 2012
A Little Less Pretty and a Little More Real
On Sunday, after guild, Sheila and I went out for coffee and got to talking about the seemingly high level of "pretty" and "perfect" we've been seeing in the crafty world on blogs and social media. There has always been some level of perfectionism but it seems to have hit an all-time high and I've noticed (especially on Instagram) a proliferation of perfectly placed and filtered photos. I have definitely been guilty of this myself on a few occasions, and I can't help but think that by portraying our lives as shiny and pretty all of the time that we may be doing a disservice to our community.
I know, from talking to numerous bloggers and crafty peeps, that these not-quite-true glimpses into our lives lead to feelings of inferiority and to people feeling that they don't quite measure up to what they see online - this is not a good thing. Of course, every person's blog and social media space is, just that, their own space and nobody should feel that they can't show their lives the way they want to - heck, I'm not going to start photographing the dust that accumulates on the TV for y'all. But it's not really about not showing the bad, it's about over-gilding the rest to make it prettier than it actually is. My life is incredibly un-pretty most of the time.
To honour that, I am going to share some of the not-so-pretty, but very real, in my own life.
This is my kitchen and this is where I sew. I don't have a studio or even a corner - the sewing machine and ironing board get packed away as I finish each project. There is food on the counter from Alex's mum, a mop in the corner, a phone book under the cabinet, and I use an extension cord in order to plug my machine and iron into the one outlet our kitchen has. This is just the way it is.
I cut fabric on the living room floor. I'm sure this is very bad for my back, but it's a good space. Usually I watch TV shows or movies on the TV or laptop while cutting - yesterday, while prepping a new tutorial, it was Supernatural. That there is my scrap box and it lives under the couch along with many of my tools. The giant cutting board slides in behind the couch when not being used.
The stash...yep, it ain't pretty! And yes, this is it. There's some fabric in the little wire shelf unit and in the purple canvas boxes on the floor (solids and packaging materials in one and voile, lawn, and some other miscellaneous bits in the other). And yes, that's my "design wall" curling over in the picture - I haven't used it in an age because it obviously doesn't work and should really just take that batting down (oh, and can I just mention that that's not actually batting either - it's Insul-Bright. Yep. Oy).
Yarn stash. All stashed in the den on the back of the door in an organizer designed for hanging shoes. Well, hey now, I thought this was pretty ingenious when I came up with it. There's got to be other people out there who thought of this before me though, right?
My poor ugly, ugly feet! This is why there has only been one time (that I can think of) that my feet have shown up on this blog without socks on... everybody is always taking pictures of blocks and things that have little peeks of their feet in them and I always think "cute!" but then I look at my own feet and I think "ugh". I even have a half tan across each foot right now from wearing moccasins... oh ya, that's a good look. My nail polish is kinda fun but that's about it - actually, to be utterly truthful, I still can't decide if I like that polish or not and I've been wearing it for close to a week.
I miss the community that was actually a community where people talked and became friends, where it wasn't about outdoing your neighbour, and where sharing was more than just pretty pictures. And maybe that loss of community has been what has made the "perfect" stand out even more to me now, and maybe the "perfect" is a product of our fast paced lives where we aren't necessarily reading blogs so much anymore, but are rather just looking at the pictures (and of course, this is the whole premise that Instagram is based on).
I know that there are many people who won't necessarily agree with me, people who do, and people who half-agree (I think I covered you all, haha!) but even now, having only just finished writing, I feel better for having said what was on my mind. I would really like to hear what you think whether you agree, whether your sorta-kinda-agree, or whether you think I am flat out crazy.
I know, from talking to numerous bloggers and crafty peeps, that these not-quite-true glimpses into our lives lead to feelings of inferiority and to people feeling that they don't quite measure up to what they see online - this is not a good thing. Of course, every person's blog and social media space is, just that, their own space and nobody should feel that they can't show their lives the way they want to - heck, I'm not going to start photographing the dust that accumulates on the TV for y'all. But it's not really about not showing the bad, it's about over-gilding the rest to make it prettier than it actually is. My life is incredibly un-pretty most of the time.
To honour that, I am going to share some of the not-so-pretty, but very real, in my own life.
This is my kitchen and this is where I sew. I don't have a studio or even a corner - the sewing machine and ironing board get packed away as I finish each project. There is food on the counter from Alex's mum, a mop in the corner, a phone book under the cabinet, and I use an extension cord in order to plug my machine and iron into the one outlet our kitchen has. This is just the way it is.
I cut fabric on the living room floor. I'm sure this is very bad for my back, but it's a good space. Usually I watch TV shows or movies on the TV or laptop while cutting - yesterday, while prepping a new tutorial, it was Supernatural. That there is my scrap box and it lives under the couch along with many of my tools. The giant cutting board slides in behind the couch when not being used.
The stash...yep, it ain't pretty! And yes, this is it. There's some fabric in the little wire shelf unit and in the purple canvas boxes on the floor (solids and packaging materials in one and voile, lawn, and some other miscellaneous bits in the other). And yes, that's my "design wall" curling over in the picture - I haven't used it in an age because it obviously doesn't work and should really just take that batting down (oh, and can I just mention that that's not actually batting either - it's Insul-Bright. Yep. Oy).
Yarn stash. All stashed in the den on the back of the door in an organizer designed for hanging shoes. Well, hey now, I thought this was pretty ingenious when I came up with it. There's got to be other people out there who thought of this before me though, right?
My poor ugly, ugly feet! This is why there has only been one time (that I can think of) that my feet have shown up on this blog without socks on... everybody is always taking pictures of blocks and things that have little peeks of their feet in them and I always think "cute!" but then I look at my own feet and I think "ugh". I even have a half tan across each foot right now from wearing moccasins... oh ya, that's a good look. My nail polish is kinda fun but that's about it - actually, to be utterly truthful, I still can't decide if I like that polish or not and I've been wearing it for close to a week.
I miss the community that was actually a community where people talked and became friends, where it wasn't about outdoing your neighbour, and where sharing was more than just pretty pictures. And maybe that loss of community has been what has made the "perfect" stand out even more to me now, and maybe the "perfect" is a product of our fast paced lives where we aren't necessarily reading blogs so much anymore, but are rather just looking at the pictures (and of course, this is the whole premise that Instagram is based on).
I know that there are many people who won't necessarily agree with me, people who do, and people who half-agree (I think I covered you all, haha!) but even now, having only just finished writing, I feel better for having said what was on my mind. I would really like to hear what you think whether you agree, whether your sorta-kinda-agree, or whether you think I am flat out crazy.
Friday, May 18, 2012
My Little Not-At-Market Crafty Party!
Hey y'all! How's everybody doing? As you can probably tell from the title of this post, I am not at Quilt Market this year - pretty darn sad I must say, but I have been following my peeps and all their exploits online so at least I get to live vicariously though them. It's okay though, hopefully I will be back in the Fall (or next Spring at the very least).
Remember back in this post when I shared the Go Anywhere Bag I made and said that it was the second one that I had made? Well now I can finally share the first one that I made as a gift!! Hurrah!
This little bag was a birthday present for my bestie Jennifer - it was quite late in arriving since I didn't get it sent out quite as speedily as I would have liked and that was compounded by the fact that it ended up coming back to me with Jennifer's address (which I had written in permanent marker) completely rubbed off the outside of the package! So of course then it had to go out again, but it arrived this week (unscathed, thank goodness).
I used the Go Anywhere Bag pattern by Anna Graham of Noodlehead which I think is just fabulous! The two exterior fabrics are a blue chambray and a print from Patty Young's Flora & Fauna line (it just occurred to me that I bought this fabric at Crafty Planet in Minneapolis with Jennifer during my first Quilt Market). The main interior fabric is from Tula Pink's Parisville and, just like the other version, I did two pockets on the inside.
And again, just like the other one, I bound the two exterior pockets rather than using piping or simply folding over the layers and top stitching. This particular fabric is from Oliver + S' City Weekend. And yes, for anyone who might be wondering, in the first picture that is a little model of Green Gables holding up the bag *wink*!
Just this past week I was asked to join the Joy Circle for do. Good Stitches - fun! Tonight I made my very first blocks for May...
For this months blocks we followed the tutorial for Boxed Strings that Becca posted to her blog. We're not cutting them up and re-sewing them at this point though - Becca will do that once she receives them all. The idea here was to go for fun, girly fabrics that would be appropriate for a teenage girl or young woman.
I am super-excited to be participating in this bee and doing a little good for charity; I also can't wait to get to know the ladies in my circle (hey girls!), many of whom are fellow Canadians.
I also started knitting a new pair of socks! These are the Diagonal Lace Socks from Wendy D. Johnson's Socks from the Toe Up. I'm using the magic loop method and the yarn is a Harvest Gold fingering weight (superwash merino/nylon) from Aspen Moon Arts on Etsy (shop is on vacation right now while the owner moves). I've had this book sitting on my shelf for quite awhile now (quite possibly about two years) and I finally just said to myself "okay, let's do it". I've never knit socks from the toe up before but I knew even before trying it that it would be my preferred method.
Now, I must get back to my sock knitting andcrying not-crying over missing quilt market! Let me know what you're up to this crafty weekend - did I mention it's also a holiday weekend in Canada? Happy (193rd) birthday Queen Victoria!
(Please ignore the giant gaps between my toes...)
Remember back in this post when I shared the Go Anywhere Bag I made and said that it was the second one that I had made? Well now I can finally share the first one that I made as a gift!! Hurrah!
This little bag was a birthday present for my bestie Jennifer - it was quite late in arriving since I didn't get it sent out quite as speedily as I would have liked and that was compounded by the fact that it ended up coming back to me with Jennifer's address (which I had written in permanent marker) completely rubbed off the outside of the package! So of course then it had to go out again, but it arrived this week (unscathed, thank goodness).
I used the Go Anywhere Bag pattern by Anna Graham of Noodlehead which I think is just fabulous! The two exterior fabrics are a blue chambray and a print from Patty Young's Flora & Fauna line (it just occurred to me that I bought this fabric at Crafty Planet in Minneapolis with Jennifer during my first Quilt Market). The main interior fabric is from Tula Pink's Parisville and, just like the other version, I did two pockets on the inside.
And again, just like the other one, I bound the two exterior pockets rather than using piping or simply folding over the layers and top stitching. This particular fabric is from Oliver + S' City Weekend. And yes, for anyone who might be wondering, in the first picture that is a little model of Green Gables holding up the bag *wink*!
Just this past week I was asked to join the Joy Circle for do. Good Stitches - fun! Tonight I made my very first blocks for May...
For this months blocks we followed the tutorial for Boxed Strings that Becca posted to her blog. We're not cutting them up and re-sewing them at this point though - Becca will do that once she receives them all. The idea here was to go for fun, girly fabrics that would be appropriate for a teenage girl or young woman.
I am super-excited to be participating in this bee and doing a little good for charity; I also can't wait to get to know the ladies in my circle (hey girls!), many of whom are fellow Canadians.
I also started knitting a new pair of socks! These are the Diagonal Lace Socks from Wendy D. Johnson's Socks from the Toe Up. I'm using the magic loop method and the yarn is a Harvest Gold fingering weight (superwash merino/nylon) from Aspen Moon Arts on Etsy (shop is on vacation right now while the owner moves). I've had this book sitting on my shelf for quite awhile now (quite possibly about two years) and I finally just said to myself "okay, let's do it". I've never knit socks from the toe up before but I knew even before trying it that it would be my preferred method.
Now, I must get back to my sock knitting and
(Please ignore the giant gaps between my toes...)
Subscribe to:
Posts (Atom)