Welcome everyone to the second day of the Quilt Uber-Fest quilt along! I'm really glad that you're all joining me here today and I can not wait to see the blocks that y'all come up with over the next little bit. I've called my block design "Flying North" because the flying geese and log cabin motif reminded me of Canadian geese flying over sections of farmland.
Fabrics I Used:
Three prints from Nel Whatmore's Sleeping Beauty for Free Spirit
Woven Haze Stripe in Denim Blue by Kaffe Fassett
Bonus Fabric: Kona Cotton in Ash
*Note: All seams are 1/4" and please remember to press in between each step. The block will end up being 12.5x12.5" square with a finished size of 12x12" square.
Cutting Directions:
-Cut two squares measuring 4x4" from each the Kona Ash solid and one Sleeping Beauty print (I used print #PWNW013Purple) for a total of four squares.
-Cut one 2.5x6.5" strip and one 2.5x10.5" strip from one Sleeping Beauty print (I used print #PWNW017Brown).
-Cut one 2.5x8.5" strip and one 2.5x12.5" strip from the last Sleeping Beauty print (I used print #PWNW015Purple).
-Cut one 2.5x8.5" strip and one 2.5x10.5" strip from the Kaffe Fassett woven.
Making HSTs:
-Draw a line diagonally from point to point on the wrong side of your two solid squares.
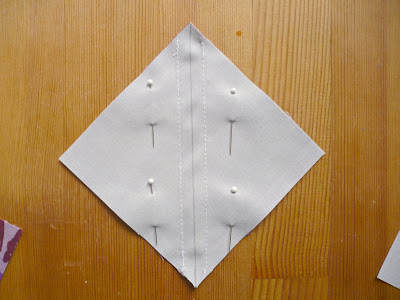
-Pin a solid block, right sides together, with a print block and sew 1/4" away on either side of the diagonal line.
-Using your rotary cutter or a pair of scissors cut the square into two triangular pieces using the original line that you drew as your guide.
-Open up each triangle and press the centre seam open. Trim each block if necessary to 3.5x3.5" square and cut off the little nubbins that are jutting out.
-Repeat the above steps with your remaining solid and print blocks until you are left with four half-square triangles.
Constructing the Geese:
-Layout your HSTs as shown above.
-Take each of your sets of matching HSTs and sew, right sides together, along the joining edge.
-Now that your two geese are constructed place them rights together and sew along the centre joining edge.
The Log Cabin:
-Sew your 2.5x6.5" strip, right sides together, to the bottom of the flying geese.
-Sew the first of your 2.5"x8.5" strips, right sides together, to the right side of the flying geese.
-Sew the second of your 2.5x8.5" strips, right sides together, to the bottom of the block.
-Sew the first of your 2.5x10.5" strips, right sides together, to the right side of the block.
-Sew the second of your 2.5x10.5" strips, right sides together, to the bottom of the block.
-And finally, sew your 2.5x12.5" strip, right sides together, to the right side of the block. Look at that - you're done!
I hope that you all enjoyed being here and that you've also enjoyed making "Flying North" with me. I've turned this tutorial into a PDF too which you can find here! Remember to add photos of your completed blocks to the Uber-Fest Flickr group and please come back and visit anytime you'd like! Also, add your block to the Miss Print Tutorials and Patterns Flickr group if you'd like too!
Next up with block three tomorrow, we have: Karen Linton who, since she does not have a blog, will be guest posting the tutorial on Scott's blog!


Thats a fun block, and I love your fabric choices.
ReplyDelete-Julia
Http://bluejcottage.blogspot.com
Oh, what a cool idea combining the two elements of geese and logs
ReplyDeleteOoops! I accidentally desleted this comment from Pam at Just Another Day:
ReplyDeleteAwesome block, it has me eying my fabric for possible choices.
These blocks are going to all be so cool!
ReplyDeletefun block!
ReplyDeleteLove your Flying Geese Over Log Cabins--thank you for tutorial--a new reader--Julierose
ReplyDeleteInteresting combination...love it!!! Colors are great!
ReplyDeleteblock looks great - hope mine looks as good :)
ReplyDeletevery pretty color combo!
ReplyDelete