I finished my last two classes of the semester today! I still have one more paper to hand in, but it isn't due until the 20th since the prof gave the whole class an extension, yay! It's a 15-20 page paper and I already have 10 pages of notes, plus I'm writing about something I like so I think I'll be fine. I will be taking at least one summer course; I've actually signed up for two, but I'm considering dropping the second one. It all depends on how the Summer job hunt pans out; keep your fingers crossed for me!
I really can't wait to get back to my sewing and quilting! I have so many quilt designs waiting to be stitched up that I really hope I can get them done in time to present the at Quilt Market. Oh gosh, Quilt Market is going to be so great and I just can't wait!
I mentioned a few posts back that I sewn up a few things for friends that I couldn't show until I was sure they received them, and one of them made it to its new home earlier in the week. I'm sure many of you remember that a few months back my lovely friend Katy gifted me with a generous stash of Denyse Schmidt's Flea Market Fancy (see this post), and so I decided that I just had to make her a little something to thank her for being so kind and generous.
Here is the front of the little pillow cover I made her. For some reason when I was thinking about making something for Katy I couldn't get the mermaid out of my mind; I embroidered the mermaid in the centre panel (which sort of reminds me of some of the burlesque style mermaid tattoos I've seen) and the surrounding prints are a mixture of Denyse Schmidt, Heather Bailey, Amy Butler and Joel Dewberry.
Here is the back of the pillow; all of the prints are from Denyse Schmidt's County Fair collection and I adore these buttons - they're wood and I have them in a few colours and sizes. I just had to use some Denyse Schmidt fabrics since Katy had been so generous with hers - it's like little link between us!
Katy said that she loved it and that it was "very sweet and lovely"; I am so happy that she likes it!
On the quilting front, I just ordered a 1/4" foot for Genevieve (my Janome) and it's on its way as we speak. Man, was it a pain to get! I have a front loading Janome and had a hard time finding the proper foot for it, even with the part number. I found a couple online, but the shipping from the US was $16-70 (not even kidding!) for a little tiny foot! I was not having any of that; I eventually found one that was a good price with good shipping, I ordered it, and paid but then received a refund from them the next day saying that they weren't authorized to ship Janome products to Canada - so ridiculous!
I ended up getting mine from England, and even though it was a bit more than I wanted to pay originally, it was cheaper than from the US and I can't wait for it to arrive! Jennifer was quite shocked when she found out that I didn't already own a 1/4" foot, I've just been doing it by eye this whole time, but I'm excited to see how it changes my piecing when I try it out.
Okay, off to hang out with my love and watch a little TV. I am so tired that I can't even explain it, I'm hoping that after getting a good night's sleep (I haven't had a proper sleep in quite awhile) I'll feel a lot better in the morning - maybe tomorrow I'll actually be able to celebrate the completion of my first year in grad school!
Thursday, April 8, 2010
Thursday, April 1, 2010
A lovely package from a lovely friend!
A few weeks ago the Liberty of London collection for Target debuted, and since I'm in Canada and we don't have Target - shame on you Target! And also shame on you for not even shipping to Canada - that is ridiculous! On that note did you know that even though we have the Gap in Canada that they don't ship to Canada either - wrap your brain around that little tidbit... sorry for that...went off on a little rant there for a sec! Anyway, as I was saying we don't have Target in Canada so my dear friend Jennifer, aka Jennifer "Big Potatoes" Davis, offered to pick me up a few things when the collection debuted. It was really quite funny! Jennifer went to Target on the morning it came out and, armed with her BlackBerry, sent me pictures as she went through the store via BlackBerry Messenger and I also looked at what was available online (which I found out was not even a fraction of what was actually available in store); we talked the whole time and it was almost as if we were shopping together. We had an absolute ball!
Unfortunately though, my package got stuck in Canadian customs in Quebec for about a week and a half and just arrived today - not cool, but I am sooooooo happy it finally arrived! Do you wanna see it? Yes? Okay!
By the way, do you like my extra-awesome skills at removing my address from view? Oh ya, that's how I roll...really, I just got a little lazy this time around. I tried to get a good picture of the cute kawaii packing tape Jennifer used, but it didn't work out so well. And yes, those are Alex's feet...and a camel looming in the background.
I bet you'd actually like to see what's in the box, wouldn't you?
Here's the first little batch of goodies! Jennifer's sweet daughter Liberty picked out the candy for me, and I think she did a great job! When I saw the wallet on the left I absolutely fell in love and I think it was the first thing that I asked Jennifer to grab for me. Jennifer picked out the mini-journal set and pad-folio for me (these weren't online), and also sent along a cute pen and a slew of fabric labels. Most of the labels are storybook based and I absolutely adore the Anne of Green Gables ones.
Here's the cute pyjama set I picked out. The fabric for the top actually matches my wallet, teehee. I love this set because of its vintage-feel and because the pieces are a little mismatchy - so good! I was thinking about bringing these to Market originally for sleepwear, but upon seeing them in real life they might be a little skimpy. Alex actually referred to this set as pyjam-erie (combination of pyjamas and lingerie), he's a pretty funny boy!
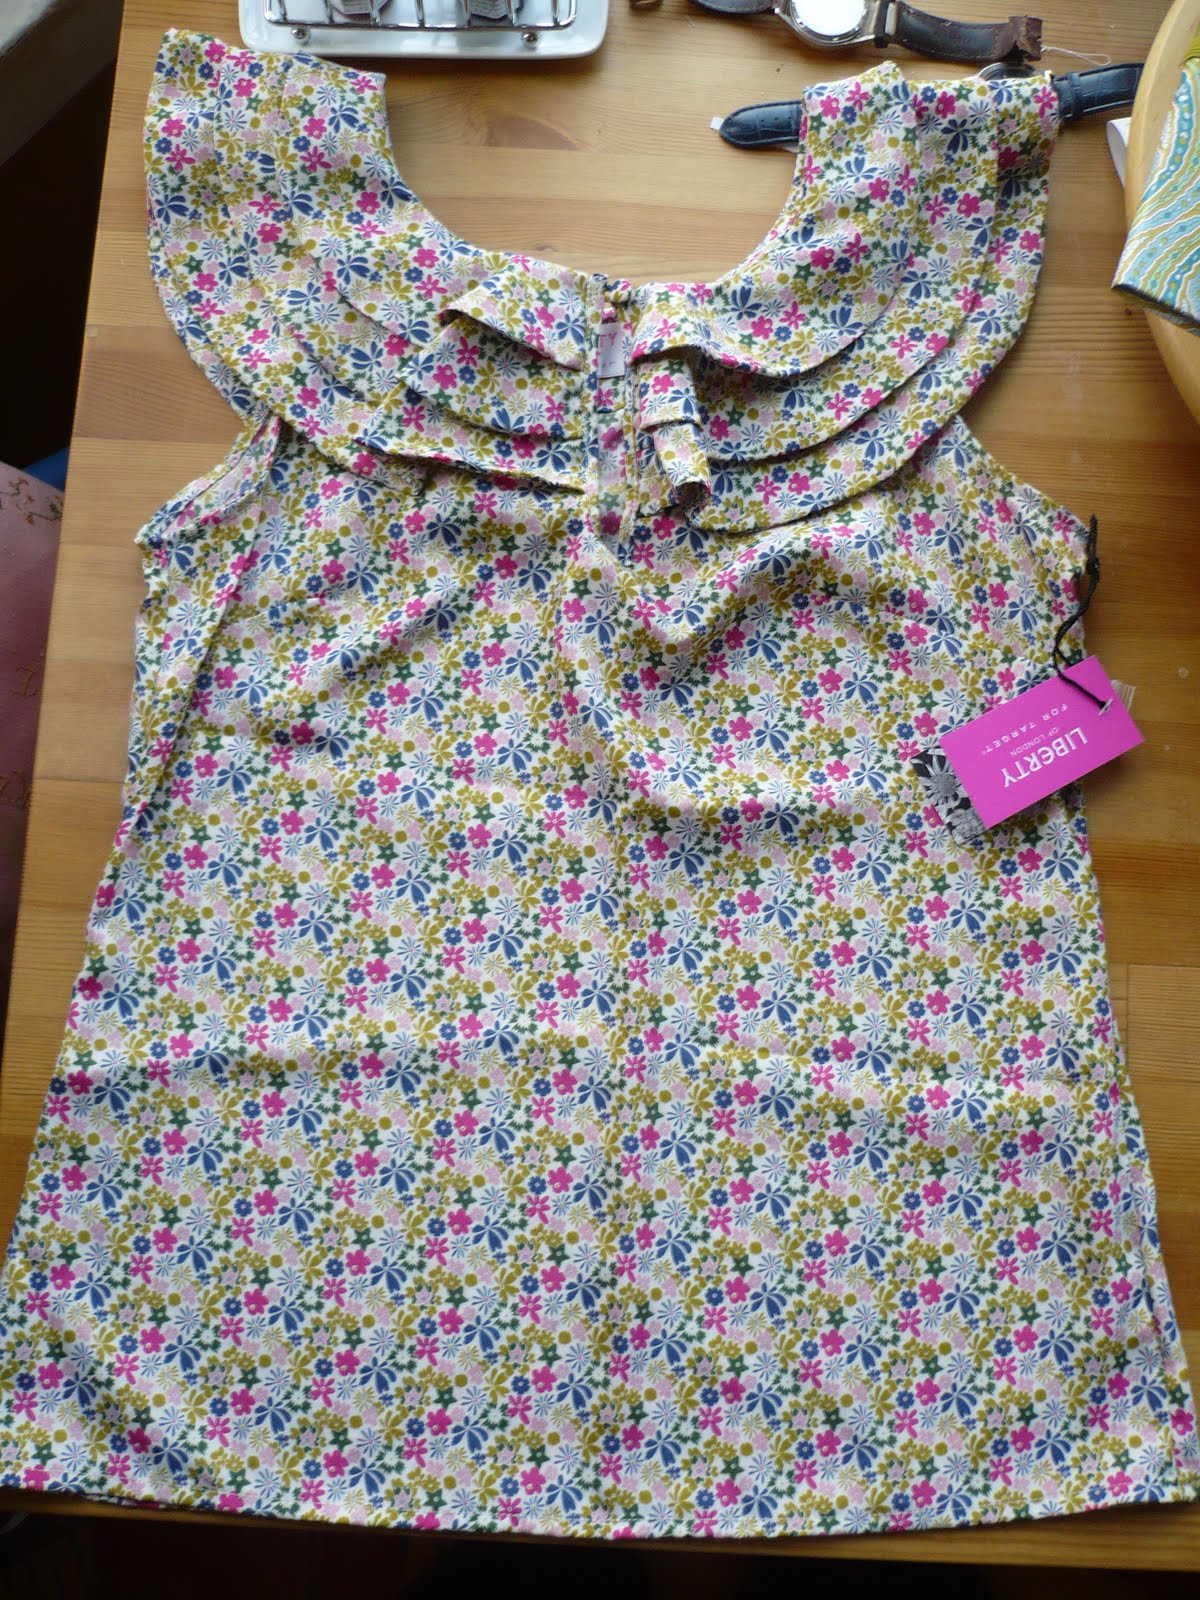
And last, but not least, is the cute top I picked out. It came out that Jennifer actually bought one of these for herself before I requested it - I think we should wear them at Market...together...at the same time...oh ya, that'd go over well! We'll at least need to get a photo of us wearing them together!
Sorry about the pic, I tried to take a picture of it hanging up but couldn't get a place with sufficient light, so the table it was! If you'd like to see it on the Target site for a better view, go here. Jennifer got me the extra small, but it's actually a bit too big, so I think I'm going to have to take it in. The armpit area is really droopy, so I'll start with that area and then see if I need to take it in any more after. I don't mind the loose fit of it at all, but I don't really care for droopy armpits, teehee!
Thanks Jennifer! You rock and I love you sooooo much! I owe you a giant three-scoop ice cream cone with a waffle cone and sprinkles at Market! Would you like syrup too? Funnily enough, there is already another package from Jennifer on its way to me and I am in the middle of putting together a package for her too.
I've just put a recipe tab over in the sidebar under "My Tutorials" so that any recipes I post are easily accessible; check it out! Only one more week until school is done (although I do have an extension on one of my papers past that) and I'm down to five things that are due. Phew, I am getting pretty tired but I'm just trying to "keep on keepin' on", wish me luck everyone!
Unfortunately though, my package got stuck in Canadian customs in Quebec for about a week and a half and just arrived today - not cool, but I am sooooooo happy it finally arrived! Do you wanna see it? Yes? Okay!
By the way, do you like my extra-awesome skills at removing my address from view? Oh ya, that's how I roll...really, I just got a little lazy this time around. I tried to get a good picture of the cute kawaii packing tape Jennifer used, but it didn't work out so well. And yes, those are Alex's feet...and a camel looming in the background.
I bet you'd actually like to see what's in the box, wouldn't you?
Here's the first little batch of goodies! Jennifer's sweet daughter Liberty picked out the candy for me, and I think she did a great job! When I saw the wallet on the left I absolutely fell in love and I think it was the first thing that I asked Jennifer to grab for me. Jennifer picked out the mini-journal set and pad-folio for me (these weren't online), and also sent along a cute pen and a slew of fabric labels. Most of the labels are storybook based and I absolutely adore the Anne of Green Gables ones.
Here's the cute pyjama set I picked out. The fabric for the top actually matches my wallet, teehee. I love this set because of its vintage-feel and because the pieces are a little mismatchy - so good! I was thinking about bringing these to Market originally for sleepwear, but upon seeing them in real life they might be a little skimpy. Alex actually referred to this set as pyjam-erie (combination of pyjamas and lingerie), he's a pretty funny boy!
And last, but not least, is the cute top I picked out. It came out that Jennifer actually bought one of these for herself before I requested it - I think we should wear them at Market...together...at the same time...oh ya, that'd go over well! We'll at least need to get a photo of us wearing them together!
Sorry about the pic, I tried to take a picture of it hanging up but couldn't get a place with sufficient light, so the table it was! If you'd like to see it on the Target site for a better view, go here. Jennifer got me the extra small, but it's actually a bit too big, so I think I'm going to have to take it in. The armpit area is really droopy, so I'll start with that area and then see if I need to take it in any more after. I don't mind the loose fit of it at all, but I don't really care for droopy armpits, teehee!
Thanks Jennifer! You rock and I love you sooooo much! I owe you a giant three-scoop ice cream cone with a waffle cone and sprinkles at Market! Would you like syrup too? Funnily enough, there is already another package from Jennifer on its way to me and I am in the middle of putting together a package for her too.
I've just put a recipe tab over in the sidebar under "My Tutorials" so that any recipes I post are easily accessible; check it out! Only one more week until school is done (although I do have an extension on one of my papers past that) and I'm down to five things that are due. Phew, I am getting pretty tired but I'm just trying to "keep on keepin' on", wish me luck everyone!
Tuesday, March 30, 2010
Giveaway Winner and the "Infamous Apricot Scones" Recipe
Hey all! Just in case you missed it, I did actually post yesterday - I know posting two days in a row is just crazy for me right now! You can find yesterday's post with a new quilt sneak peak here.
So, first up we have the winner of the giveaway! Drum roll please...the winner of the giveaway is the lovely and talented Lolly! Woohoo, I'll be sending the notebook and your embellishments along soon - I kinda wish I had made a teal notebook now!
And now, for the infamous apricot scone recipe! I decided to make this recipe a little more interesting, so when I got home tonight I whipped up a batch and took pictures along the way. Are you ready for this? It's gonna be fun!
So, first up we have the winner of the giveaway! Drum roll please...the winner of the giveaway is the lovely and talented Lolly! Woohoo, I'll be sending the notebook and your embellishments along soon - I kinda wish I had made a teal notebook now!
And now, for the infamous apricot scone recipe! I decided to make this recipe a little more interesting, so when I got home tonight I whipped up a batch and took pictures along the way. Are you ready for this? It's gonna be fun!
Kaye's "Infamous Apricot Scones"
Ingredients:
2 1/2 cups all purpose flour
2 1/2 tsps baking powder
1/2 tsps baking soda
1/2 cup cold butter
2/3 cup granulated sugar
3/4 cup dried apricots, roughly chopped
1 large egg
1/2 cup half-and-half
Directions:
-Preheat oven to 400 degrees fehrenheit
-Mix flour, baking powder, and baking soda in large bowl.
-Add the butter to your bowl and cut in with a pastry cutter, or use your fingers (like I do!). If you'd prefer to use a food processor for this step, you can, but be sure to remove the contents to a bowl before you add the apricots (you wouldn't want to grind them into teeny-weeny invisible pieces, now would you?)
-Add sugar and apricots and mix well.
-In a small bowl whisk together the egg and half-and half. Pour into dry ingredients and stir until just blended.
-At this point you can do one of two things: You can turn your batter out onto a floured surface, knead 8-10 times, and shape into a flattened round. Place the round onto a baking sheet, score into 12 pieces and bake. Or you can do as I do...it's really not laziness or anything, but I actually prefer drop scones to formed wedge ones. I like the rustic nature of them and how they have even more little nooks and crannies for anything you might want to put on them. So here's what I do after I pour the wet into the dry ingredients: I get into the bowl with my hands and mix everything together that way (thus making sure everything is nicely blended, but also getting a little kneading in), then I add just a few drops of water to the batter to take the texture from a smooth dough to a bit-sticky. I then use a spoon to "drop" the dough onto the baking sheet (I can usually get 18-20 drop scones out of this recipe - they're not as small as they look in this picture, this is just one big baking sheet!).
-Bake for 12-15 minutes or until lightly browned - always be sure to test with a toothpick! Let cool, so as not to burn your little fingers, but trust me these are really good warm!
I lost the light just as I went to take this last shot, but may I suggest you try a little Bonne Maman with your scones? And no, those are not giant scones, that is just one teeny jar of Bonne Maman!
Enjoy everybody and let me know what you think! I'm going to try substituting the apricots for dried mango soon, keep your fingers crossed!
Monday, March 29, 2010
Taking joy in living is a woman's best cosmetic. -Rosalind Russell
First things first, if you're looking for the giveaway (or the design book tutorial) you can find it here. I'll be picking the winner sometime tomorrow, so there's still time to enter! As an added bonus, when I post the winner tomorrow I will also be posting my infamous apricot scone recipe...okay, it may only be infamous to about six of us on Twitter, but I figured I'd share anyway!
Granny Square update: All 150 granny squares are done! Yay! Right now, I'm just weaving in the ends and then they'll be all set to join. Hehe ya, this is me in my generally impatient state - I should have woven the ends in at the end of each square, but I wanted to get them all made so much and now I have to go through this tedious exercise 150 times in a row (and each block has 6 ends that need to be woven)!
Yesterday morning, before heading off to my Toronto Modern Quilt Guild meeting, I decided to hit up the St. Lawrence Antiques Market which happens here in Toronto every Sunday. It was great! I've been many times before, but I just love browsing through all the vintage knickknacks, books, clothing, and just plain awesome stuff. I didn't get much yesterday, but I did pick up a couple of spools of vintage ribbon and lace. And actually, when I was buying these, the man selling them informed me that the whole box of ribbon and lace he was selling had been collected by a group of people with disabilities and that whatever money he got for selling the stuff would be given back to them. I thought that was really nice!
I have made (and am still making) a few things recently, but unfortunately I can't really show any of them right now. A couple of pieces are on their way to friends, so after they receive them I'll be sure to show pictures (wouldn't want to spoil the surprise, now would we?).
So, in my last post I mentioned some news about Jennifer and I going to a certain place in May that rhymes with pinneapolis. Only one person (Bonnie) took a stab at guessing where it was we're going - she guessed Indianapolis for Indy 500, which frankly is a pretty good guess considering the information that I gave, but it wasn't the right one! We're heading to (Spring) International Quilt Market in Minneapolis!
For those of you who may not know, International Quilt Market is a giant (and I mean giant) trade show that is held twice a year - the Fall one is always in Houston and the Spring one moves around. Fabric companies and designers all converge to show off their new collections and designs for the upcoming season, oftentimes these items won't be released to the public for another six months. Fabric shops (online, and brick and mortar shops) attend Market to decide what fabrics, patterns, notions, etc they want to purchase for their shops in person; often designers attend Market to show their fabric and pattern designs to reps in the hopes of either being picked up by a company or as a means of getting their name out there.
Market is going to be awesome all by it self, and I'll finally get to meet in real life a lot of people that I originally met online such as Jennifer, Cara, Monica, and Lissa. There are also a few other people who've said they'd like to meet like Kate Spain. I also have serious plans to do a little stalking...by stalking I mean continuously walking past their booths taking covert photos...maybe I'll work up the nerve to approach a couple of them...Amy Butler, Heather Bailey, Camille Roskelley, Anna Maria Horner anyone? Teehee!
But, one of the big reasons that I am heading to Market is to show my quilt pattern designs to some reps and other people! It's just so cool! Above you can see a sneak peak of one of my most recent patterns made using fabrics from Kate Spain's Verna Line. This is part of the reason why I haven't been able to show much of what I've been working on lately - gotta keep the patterns under wraps until after Market ( and hopefully a little longer too)! We'll see what happens.
Jennifer is the only person who has seen some of the new designs and we had a pretty funny moment talking over BlackBerry messenger last night when I mentioned to her that I was looking for a 1/4" foot for my sewing machine. Jennifer asked me what had happened to my old one, and I said that I had never had one, her response was "what?? how do you piece?". I explained that I just did it by eye. This may not seem funny to anyone who hasn't quilted and had to worry about seams lining up exactly, but I found it pretty entertaining.
Okay, I'm off to do some schoolwork now and the I have to leave for class in an hour and half.. Less than two weeks and I'll be done this semester (thank goodness). I'll be back tomorrow with the giveaway winner and the "infamous apricot scone recipe".
Granny Square update: All 150 granny squares are done! Yay! Right now, I'm just weaving in the ends and then they'll be all set to join. Hehe ya, this is me in my generally impatient state - I should have woven the ends in at the end of each square, but I wanted to get them all made so much and now I have to go through this tedious exercise 150 times in a row (and each block has 6 ends that need to be woven)!
Yesterday morning, before heading off to my Toronto Modern Quilt Guild meeting, I decided to hit up the St. Lawrence Antiques Market which happens here in Toronto every Sunday. It was great! I've been many times before, but I just love browsing through all the vintage knickknacks, books, clothing, and just plain awesome stuff. I didn't get much yesterday, but I did pick up a couple of spools of vintage ribbon and lace. And actually, when I was buying these, the man selling them informed me that the whole box of ribbon and lace he was selling had been collected by a group of people with disabilities and that whatever money he got for selling the stuff would be given back to them. I thought that was really nice!
I have made (and am still making) a few things recently, but unfortunately I can't really show any of them right now. A couple of pieces are on their way to friends, so after they receive them I'll be sure to show pictures (wouldn't want to spoil the surprise, now would we?).
So, in my last post I mentioned some news about Jennifer and I going to a certain place in May that rhymes with pinneapolis. Only one person (Bonnie) took a stab at guessing where it was we're going - she guessed Indianapolis for Indy 500, which frankly is a pretty good guess considering the information that I gave, but it wasn't the right one! We're heading to (Spring) International Quilt Market in Minneapolis!
For those of you who may not know, International Quilt Market is a giant (and I mean giant) trade show that is held twice a year - the Fall one is always in Houston and the Spring one moves around. Fabric companies and designers all converge to show off their new collections and designs for the upcoming season, oftentimes these items won't be released to the public for another six months. Fabric shops (online, and brick and mortar shops) attend Market to decide what fabrics, patterns, notions, etc they want to purchase for their shops in person; often designers attend Market to show their fabric and pattern designs to reps in the hopes of either being picked up by a company or as a means of getting their name out there.
Market is going to be awesome all by it self, and I'll finally get to meet in real life a lot of people that I originally met online such as Jennifer, Cara, Monica, and Lissa. There are also a few other people who've said they'd like to meet like Kate Spain. I also have serious plans to do a little stalking...by stalking I mean continuously walking past their booths taking covert photos...maybe I'll work up the nerve to approach a couple of them...Amy Butler, Heather Bailey, Camille Roskelley, Anna Maria Horner anyone? Teehee!
But, one of the big reasons that I am heading to Market is to show my quilt pattern designs to some reps and other people! It's just so cool! Above you can see a sneak peak of one of my most recent patterns made using fabrics from Kate Spain's Verna Line. This is part of the reason why I haven't been able to show much of what I've been working on lately - gotta keep the patterns under wraps until after Market ( and hopefully a little longer too)! We'll see what happens.
Jennifer is the only person who has seen some of the new designs and we had a pretty funny moment talking over BlackBerry messenger last night when I mentioned to her that I was looking for a 1/4" foot for my sewing machine. Jennifer asked me what had happened to my old one, and I said that I had never had one, her response was "what?? how do you piece?". I explained that I just did it by eye. This may not seem funny to anyone who hasn't quilted and had to worry about seams lining up exactly, but I found it pretty entertaining.
Okay, I'm off to do some schoolwork now and the I have to leave for class in an hour and half.. Less than two weeks and I'll be done this semester (thank goodness). I'll be back tomorrow with the giveaway winner and the "infamous apricot scone recipe".
Tuesday, March 23, 2010
Graph Paper Design Book Tutorial and a Giveaway!
Woohoo, it's time for my first tutorial! It does not involve fabric, but it is sewing and design related. I have some other things to share with you guys (some cool stuff has been going on), but I want to keep this post just for the tutorial and the giveaway, so I will be back in a couple of days to share other news. If you really *need* to know, Jennifer did share the most exciting thing on her blog...it involves us going somewhere...somewhere that rhymes with pinneapolis...in May...
Okay, so here's the background on my first little tutorial. A few months ago I was looking for a graph paper notebook to carry around with me when working on quilt designs, but could not find them anywhere (even though I've seen them before). I ended up buying just a notepad of graph paper, but find it difficult to carry around in my bag since it doesn't have covers and the pages end up getting caught, scrunched, and torn because of everything else in my purse. It's also a bit big to be carrying around in my purse - although if you've seen my purse, you wouldn't think this was an issue - so I decided to make my own!
These notebooks are great for any kind of design work where you might want to some sort of dimensional reference, I also thought they could be neat for kids for math homework (I always liked doing math on graph paper) or for drawing. Really, these could be fun for just about anything - the possibilities are endless!
Here are the instructions (with a giveaway at the end of the post):
You will need:
10 sheets 8.5x11" graph paper
1 sheet card stock
About 22" thread, ribbon or twine for binding (I used waxed macramé thread)
Needle (thicker, so that it can punch through the paper easily)
Pencil
Bone folder
Scissors
4 paperclips
Embellishments (patterned papers, ribbon, stickers, embroidery thread, etc.)
Instructions (and remember, you can make any of the pictures bigger by clicking on them):
-Take your 10 sheets of graph paper, with the graph side facing up, and fold them in half. Use your bone folder to get a nice crisp edge.
-Do the same with your piece of card stock.
-Open up your graph paper to the centre and, using your pencil, mark seven dots along the crease. Since the graph paper is basically see-through, I used the blocks of the graph paper as my markers. I marked two blocks up from the bottom and then marked every 5 blocks until I was left with two at the top again (see picture for explanation and ignore the one little dot that didn't erase all the way).
-Insert your graph paper booklet inside of the folded card stock cover and use your paperclips at each corner to secure everything in place.
-Using your needle (without thread) punch through the dots you made so that the needle comes out on the card stock side. Punching the holes through first will help when you go to sew the binding.
-Insert your threaded needle into the first bottom hole from the inside (i.e. graph paper side, not card stock side), leave a short tail (about 2-3") for tying off at the end.
-From the card stock side of the booklet, insert your needle into the next hole up and pull through. You're basically going to be doing a running stitch here. Continue this until you reach the top hole.
-When you reach the top hole, pull the needle through to the card stock side.
-Take your thread and wrap it around the top of the booklet so that it lies flat against the spine and comes over to the graph paper side of your booklet. Insert the needle back into the top hole so that it comes out on the card stock side.
-Here's what it looks like once the needle has been pulled all the way through to the card stock side.
-Insert needle into next hole down and continue until you reach the bottom hole. Doing this "double-running stitch" (that's what I call it) will insure that all spaces on both the spine and inner crease are covered.
-When you reach the bottom hole do just the same thing that you did with the top hole (except that you are going from the graph paper side to the card stock side and back to the graph paper side). Pull both threads (your starting tail and the end tail) down to the bottom and tie them against the bottom of the booklet (I used about four knots, teehee).
-Your little booklet is now done!
-Embellish the booklet in anyway you choose!
-You'll notice when you open your booklet that for the first half of the book, you have graph paper on the right hand side and blank paper on the left hand side. The centre will be two blank pages. I find these blank pages good for making notes, or gluing small pieces of fabric into the booklet. Also, you'll notice that after the centre crease, the graph paper is on the left hand side and the blank paper is on the right. You can either now design on the left hand side, or do as I did and flip the book once you get to the half of the book so that the graph paper is on the right again.
-I didn't really embellish the other side that much, but here ya go!
Now for the giveaway! I am giving away one of these handmade booklets, as well as some embellishments (patterned papers[including some Amy Butler], embroidery floss, ribbon, etc.), covered paperclips, and waxed macramé thread so that you can make your own! Since graph paper, regular card stock, and needles are pretty easy to some by, I am not including those things.
This notebook actually has a slate sticker on the front, and you can use chalk to write on it (wipes off with a damp sponge). I only embellished the notebook on one side, so you can embellish the other if you'd like!
Leave one comment to enter the giveaway. If you are a follower of my blog (or if you become one) leave a second comment and you will get a second entry! The giveaway is open internationally and is open for one week. Yay!
If you have questions about my tutorial, please feel free to ask. Also, any constructive criticism is welcome as this is the first tutorial I've ever written! And, if you'd like, send me a picture of your completed notebook made using this tutorial and I'll post it on the blog. Thanks everyone!
*The giveaway is now closed*
Okay, so here's the background on my first little tutorial. A few months ago I was looking for a graph paper notebook to carry around with me when working on quilt designs, but could not find them anywhere (even though I've seen them before). I ended up buying just a notepad of graph paper, but find it difficult to carry around in my bag since it doesn't have covers and the pages end up getting caught, scrunched, and torn because of everything else in my purse. It's also a bit big to be carrying around in my purse - although if you've seen my purse, you wouldn't think this was an issue - so I decided to make my own!
These notebooks are great for any kind of design work where you might want to some sort of dimensional reference, I also thought they could be neat for kids for math homework (I always liked doing math on graph paper) or for drawing. Really, these could be fun for just about anything - the possibilities are endless!
Here are the instructions (with a giveaway at the end of the post):
You will need:
10 sheets 8.5x11" graph paper
1 sheet card stock
About 22" thread, ribbon or twine for binding (I used waxed macramé thread)
Needle (thicker, so that it can punch through the paper easily)
Pencil
Bone folder
Scissors
4 paperclips
Embellishments (patterned papers, ribbon, stickers, embroidery thread, etc.)
Instructions (and remember, you can make any of the pictures bigger by clicking on them):
-Take your 10 sheets of graph paper, with the graph side facing up, and fold them in half. Use your bone folder to get a nice crisp edge.
-Do the same with your piece of card stock.
-Open up your graph paper to the centre and, using your pencil, mark seven dots along the crease. Since the graph paper is basically see-through, I used the blocks of the graph paper as my markers. I marked two blocks up from the bottom and then marked every 5 blocks until I was left with two at the top again (see picture for explanation and ignore the one little dot that didn't erase all the way).
-Insert your graph paper booklet inside of the folded card stock cover and use your paperclips at each corner to secure everything in place.
-Using your needle (without thread) punch through the dots you made so that the needle comes out on the card stock side. Punching the holes through first will help when you go to sew the binding.
-Insert your threaded needle into the first bottom hole from the inside (i.e. graph paper side, not card stock side), leave a short tail (about 2-3") for tying off at the end.
-From the card stock side of the booklet, insert your needle into the next hole up and pull through. You're basically going to be doing a running stitch here. Continue this until you reach the top hole.
-When you reach the top hole, pull the needle through to the card stock side.
-Take your thread and wrap it around the top of the booklet so that it lies flat against the spine and comes over to the graph paper side of your booklet. Insert the needle back into the top hole so that it comes out on the card stock side.
-Here's what it looks like once the needle has been pulled all the way through to the card stock side.
-Insert needle into next hole down and continue until you reach the bottom hole. Doing this "double-running stitch" (that's what I call it) will insure that all spaces on both the spine and inner crease are covered.
-When you reach the bottom hole do just the same thing that you did with the top hole (except that you are going from the graph paper side to the card stock side and back to the graph paper side). Pull both threads (your starting tail and the end tail) down to the bottom and tie them against the bottom of the booklet (I used about four knots, teehee).
-Your little booklet is now done!
-Embellish the booklet in anyway you choose!
-You'll notice when you open your booklet that for the first half of the book, you have graph paper on the right hand side and blank paper on the left hand side. The centre will be two blank pages. I find these blank pages good for making notes, or gluing small pieces of fabric into the booklet. Also, you'll notice that after the centre crease, the graph paper is on the left hand side and the blank paper is on the right. You can either now design on the left hand side, or do as I did and flip the book once you get to the half of the book so that the graph paper is on the right again.
-I didn't really embellish the other side that much, but here ya go!
Now for the giveaway! I am giving away one of these handmade booklets, as well as some embellishments (patterned papers[including some Amy Butler], embroidery floss, ribbon, etc.), covered paperclips, and waxed macramé thread so that you can make your own! Since graph paper, regular card stock, and needles are pretty easy to some by, I am not including those things.
This notebook actually has a slate sticker on the front, and you can use chalk to write on it (wipes off with a damp sponge). I only embellished the notebook on one side, so you can embellish the other if you'd like!
Leave one comment to enter the giveaway. If you are a follower of my blog (or if you become one) leave a second comment and you will get a second entry! The giveaway is open internationally and is open for one week. Yay!
If you have questions about my tutorial, please feel free to ask. Also, any constructive criticism is welcome as this is the first tutorial I've ever written! And, if you'd like, send me a picture of your completed notebook made using this tutorial and I'll post it on the blog. Thanks everyone!
*The giveaway is now closed*
Saturday, March 13, 2010
Nice Things to Do
Misty Muskoka, originally uploaded by Cathlin B.
-splash in puddles while wearing my new boots
-browse the sewing books and magazines at the store
-cook a meal that takes a long time just because I can
-dance around in the living room when Alex isn't home (and sometimes when he is)
-sit in the Muskoka chair out back and read
-watch BBC dramas and adaptations
-search through used bookstores and thrift stores
-wear skirts with pretty shoes in the sunshine
-drink coffee on a patio whenever possible
-cuddle with my love
-buy fresh cut flowers just because
-tromp through the dried Fall leaves
-sew up a lovely, surprise gift for a friend
-stay in bed for as long as possible
-dress up even if I'm just going to class
-listen to music while baking cookies
-eat ice cream straight from the tub
-spend time talking with good friends
Do you have anything to add or a list of things to share?
Monday, March 8, 2010
Happy birthday to my love and some other randomness...
I'm a bad blogger...please forgive me? Because we're friends, right? Okay, good!
First of all I have to wish a very happy birthday to my love, Alex! Happy birthday baby - you're the bestest!
I have been crafting, sewing, designing, and embroidering this week (mostly designing) but still don't really have anything I can show so instead I give you some pictures of pretty randomness!
First up are the pretty tulips I bought Alex on Saturday (yes, I do sometimes buy him flowers). Tulips are one of my favourites, so I guess they're a tiny bit a present to myself too!
Would you like a granny square update? I haven't had the chance to do any since Friday, but we are now at 108! Woohoo, only 42 left to go and then *I think* I'll have enough...then I'll have to teach myself how to join them...no worries, I'm sure I'll figure it out!
Oh yes my friends, these are my new Hunter's - worn by Her Majesty and common folk alike! My old boots split after having them for about a year and a half and I decided that I wanted good quality rainboots that would last for awhile, if not forever and here they are! Gosh, they're pretty aren't they?
And Heather Bailey told me I was gorgeous today and I can't help it, but I blushed and glowed and felt all light and happy because of it! I'm sorry if mentioning this makes me sound self-involved or anything, but it really made me feel good. I know, I'm a little ridiculous; but when an awesome, famous and talented (not to mention extremely-gorgeous-herself) lady tells you you're gorgeous, it just can not be helped! Thank you Heather, you made my day!
Okay, I have to leave for class in 15 minutes and am seriously wearing my pyjamas (I put them back on when I got home this afternoon). Talk to y'all later, you guys are the greatest!
First of all I have to wish a very happy birthday to my love, Alex! Happy birthday baby - you're the bestest!
Some of you have already seen this picture of us from Halloween, but I wanted to post it again because it's one of my favourites (and there are surprisingly few pictures of us together). Alex was Max from Where the Wild Things Are and I was the female version of Tom Cruise in Risky Business.
I have been crafting, sewing, designing, and embroidering this week (mostly designing) but still don't really have anything I can show so instead I give you some pictures of pretty randomness!
First up are the pretty tulips I bought Alex on Saturday (yes, I do sometimes buy him flowers). Tulips are one of my favourites, so I guess they're a tiny bit a present to myself too!
Here is the awesome bag I bought myself last week (cheap, I got it at Winners). I love Robert Frost, and when Alex and I first met I remember having a long phone conversation about him together. Alex loves him too and we share many of the same favourite poems.
Fabricland was having a great sale last week and all Simplicity pattern were only $2.00 each (crazy, I know)! Funnily enough Amy of Things We Make just bought herself one of the same patterns (the Built by Wendy one) and we've decided that we're living parallel lives - there's a bunch of other weird little things in common that keep popping up and it's pretty entertaining!
And, I did it! I bought my dream rainboots and they're great...
And Heather Bailey told me I was gorgeous today and I can't help it, but I blushed and glowed and felt all light and happy because of it! I'm sorry if mentioning this makes me sound self-involved or anything, but it really made me feel good. I know, I'm a little ridiculous; but when an awesome, famous and talented (not to mention extremely-gorgeous-herself) lady tells you you're gorgeous, it just can not be helped! Thank you Heather, you made my day!
Okay, I have to leave for class in 15 minutes and am seriously wearing my pyjamas (I put them back on when I got home this afternoon). Talk to y'all later, you guys are the greatest!
Subscribe to:
Posts (Atom)